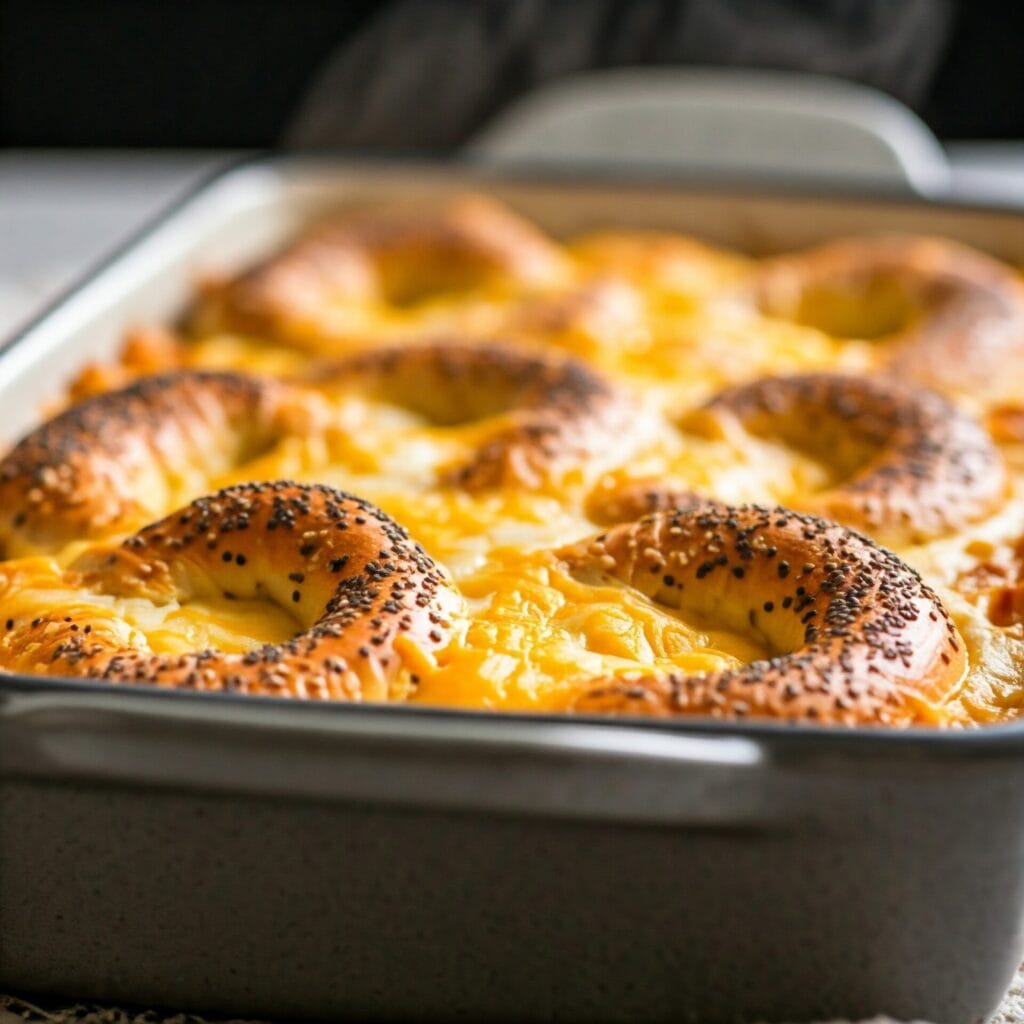
Bagel And Cheese Bake

Bagel & Cheese Breakfast Bake

This easy bagel & cheese breakfast bake turns leftover bagels into a warm, golden, cheesy casserole. 🧀🥯 Perfect for weekend brunch, holidays, or make-ahead mornings!

If you’ve got a few leftover bagels sitting on the counter, don’t toss them—transform them into this Bagel & Cheese Breakfast Bake. This cozy, crowd-pleasing casserole layers crispy bagel pieces, fluffy eggs, and loads of melted cheese for a comforting dish that’s perfect for brunch or breakfast-for-dinner.

Not only is this recipe a smart way to reduce food waste, but it’s also incredibly easy to throw together. You can prep it in advance, let it chill overnight, and bake it fresh in the morning. As a result, it’s ideal for hosting, meal prepping, or lazy weekends when you want something warm and satisfying—without the stress.

In addition, the ingredients are flexible. Choose your favorite bagel flavor, mix up the cheeses, or even toss in cooked bacon, veggies, or sausage for extra protein and texture. No matter how you customize it, this casserole always bakes up golden and bubbly, with just the right mix of crunch and creaminess in every bite.

🔥 Why You’ll Love This Bagel & Cheese Breakfast Bake

  • 🥯 Smart use of leftover bagels – No more stale bagels going to waste!

  • 🧀 Loaded with melty cheese – Every bite is rich, gooey, and comforting.

  • 🍳 Hearty and filling – Perfect for feeding a hungry family or brunch crowd.

  • ⏱️ Make-ahead friendly – Assemble it the night before and just bake in the morning.

  • 🔁 Totally customizable – Use your favorite bagel flavors, cheeses, and mix-ins like bacon, sausage, or veggies.

  • 🧊 Freezer-safe – Prep in advance and freeze portions for easy weekday breakfasts.

  • 👩‍🍳 No special skills required – If you can chop a bagel and whisk some eggs, you’ve got this.

  • Kid-friendly, brunch-worthy, and meal-prep approved – It checks all the boxes.

🔪 How to Make Bagel & Cheese Breakfast Bake

Preheat and Prep
Start by preheating your oven to 350°F (175°C). Grease a 9×13-inch baking dish with butter or non-stick spray.

Chop and Toast the Bagels
Slice your bagels into bite-sized cubes. Toast them in the oven for 5–8 minutes until lightly crisp. This helps them hold up better in the egg mixture.

Whisk the Egg Mixture
In a large mixing bowl, whisk together eggs, milk, salt, pepper, and any optional seasonings like garlic powder or dried herbs.

Layer the Bake
Spread half the toasted bagel pieces in the bottom of your dish. Sprinkle with shredded cheese, then pour over half the egg mixture. Repeat with remaining bagels, cheese, and eggs.

Let It Soak (Optional)
For best texture, let the bake sit for 20–30 minutes—or cover and refrigerate overnight for a make-ahead breakfast.

Bake Until Golden
Bake uncovered for 35–40 minutes, or until the center is set and the top is golden brown. Let cool slightly before slicing and serving.

Serve and Customize
Serve warm, topped with fresh herbs, hot sauce, or a dollop of sour cream. It pairs perfectly with fruit, coffee, or crispy bacon on the side!

Jump to Section

📱 Follow Us 

📬 Subscribe for Updates

* indicates required

Intuit Mailchimp

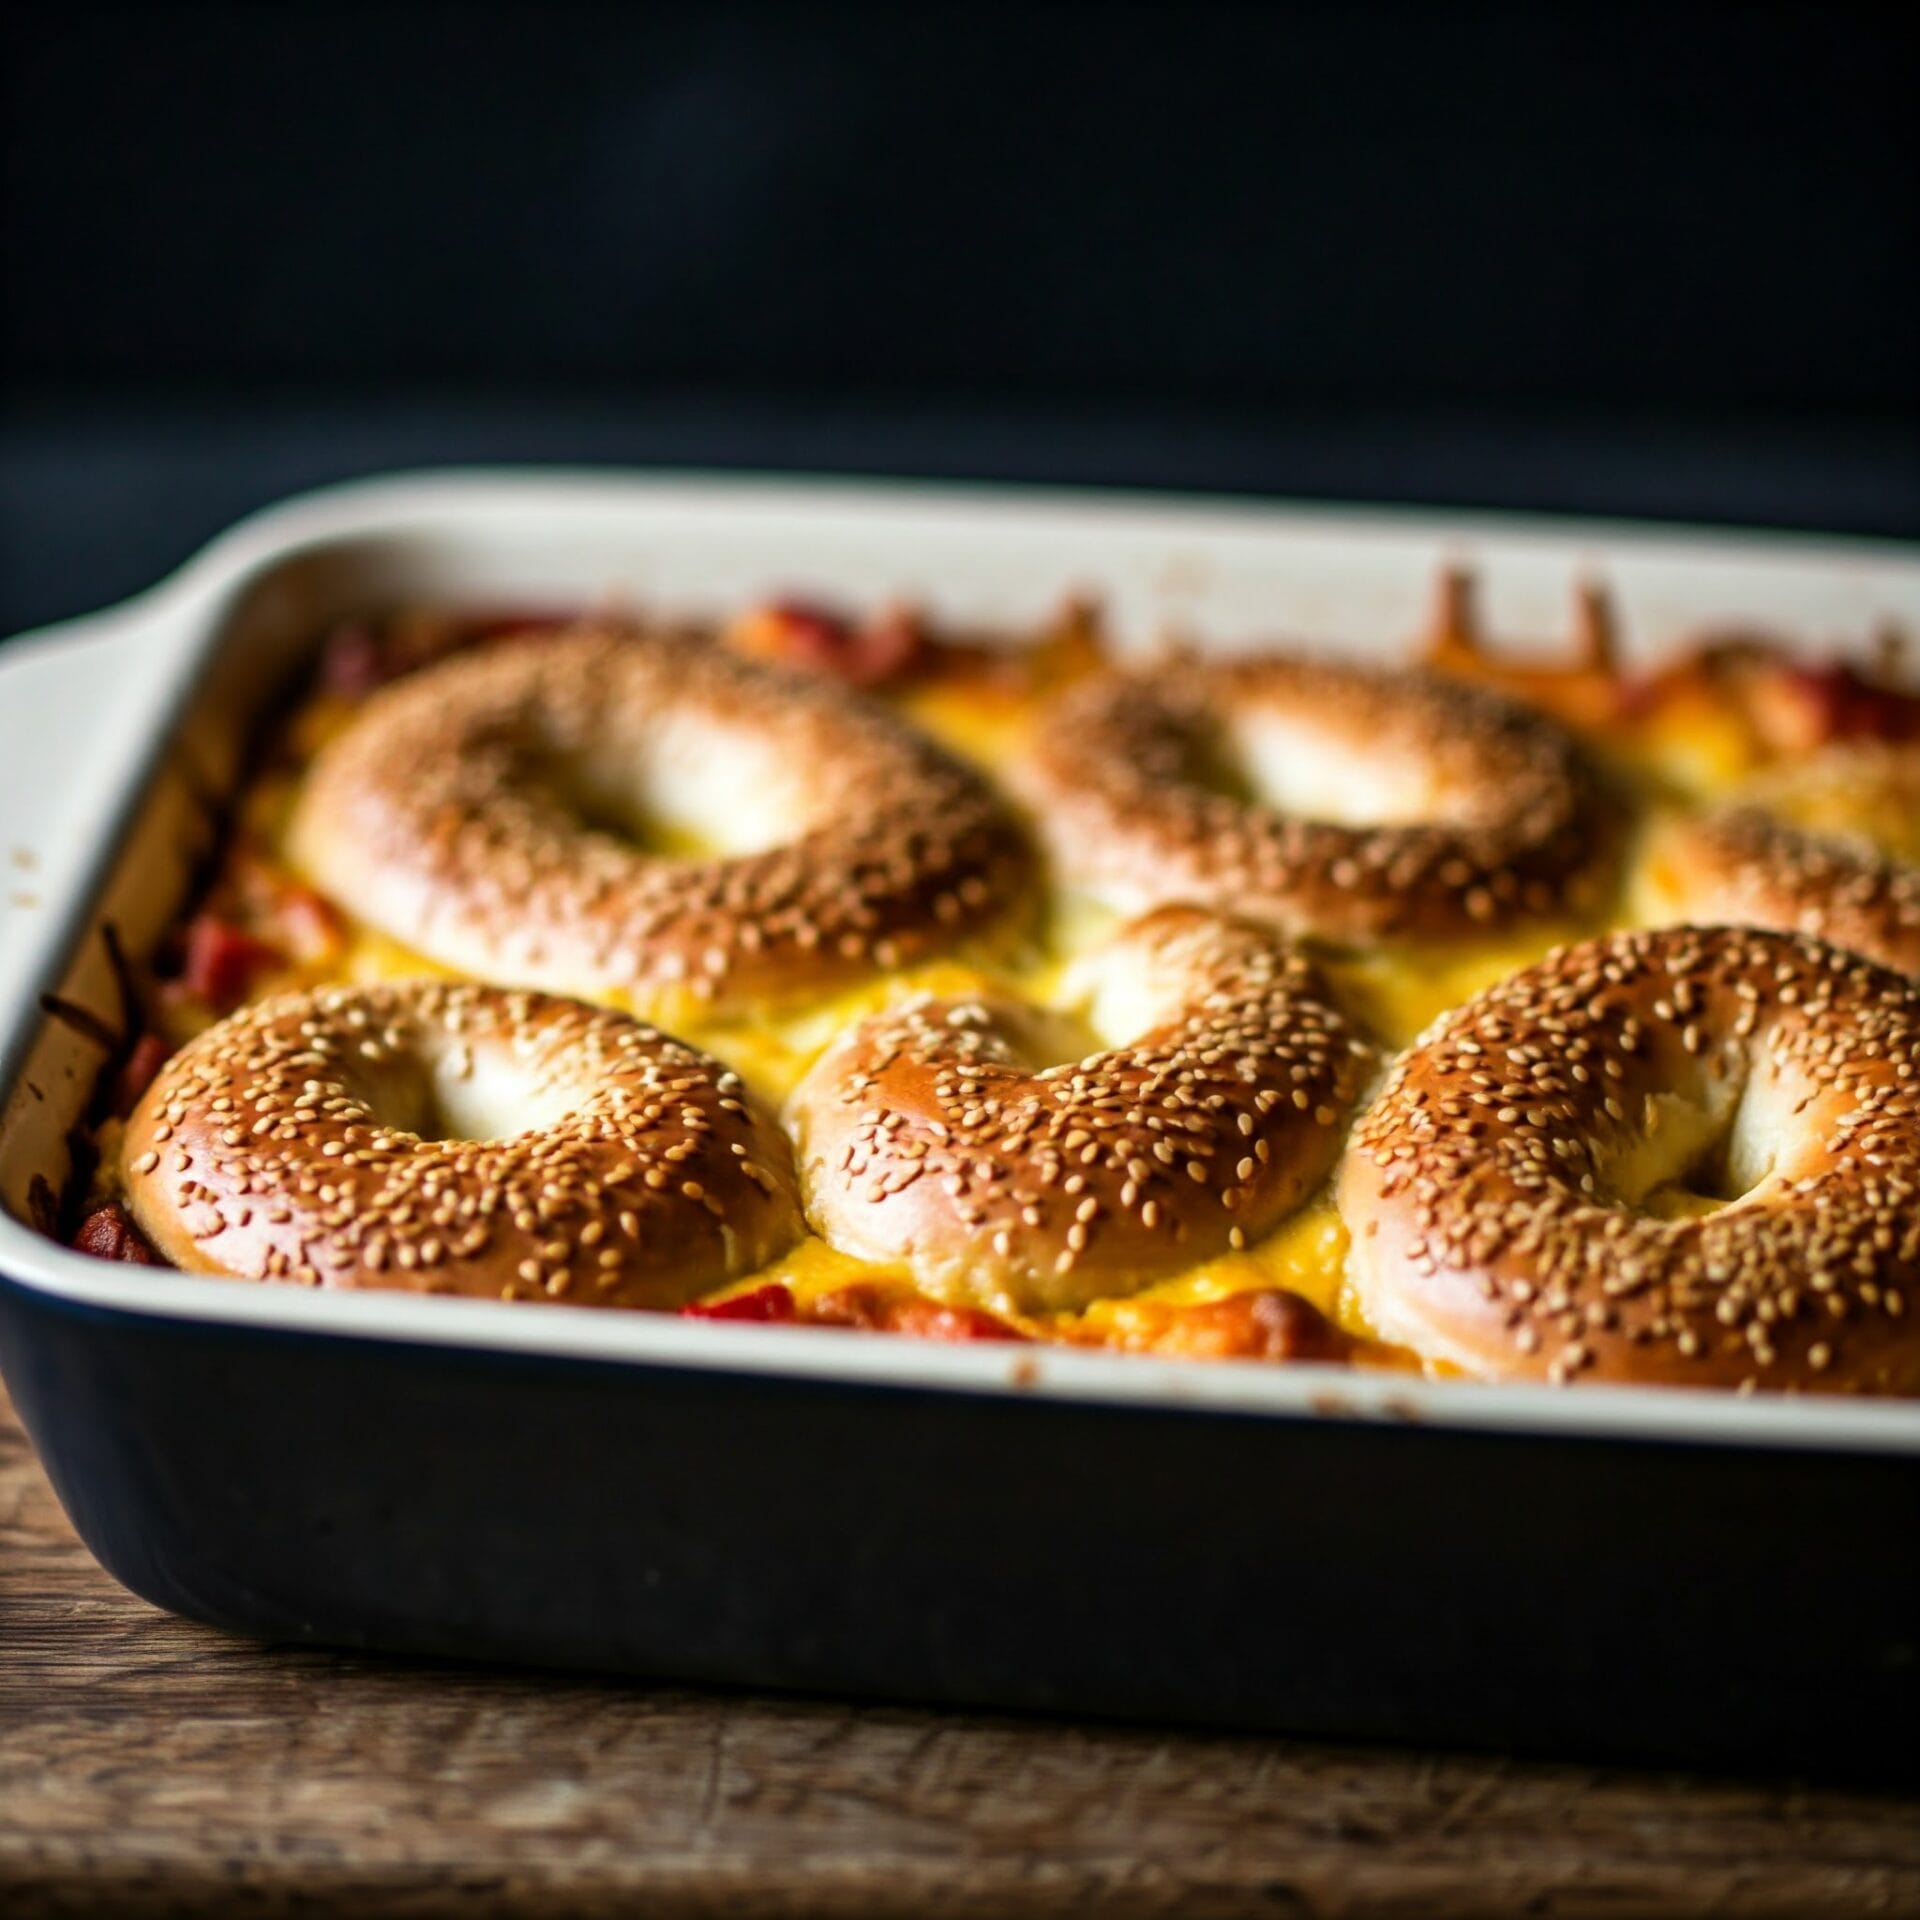
Bagel and Cheese Bake

No ratings yet
A Bagel & Cheese Bake is a hearty and comforting casserole made with layers of bagels, cheese, and eggs. It's a simple yet satisfying dish that's perfect for a quick and easy breakfast or brunch.
Prep Time 25 minutes
Cook Time 30 minutes
Additional Time 8 hours
Total Time 8 hours 55 minutes
Servings: 6 people
Course: Appetizer, Breakfast
Cuisine: American, American Fusion
Calories: 310

Ingredients
  

  • ½ Lb Bacon diced
  • ½ Cup Yellow Onion chopped
  • 6 Each Bagels Plain
  • 1 Cup Cheddar Cheese shredded
  • 12 Large Eggs beaten
  • 2 Cups Milk
  • 2 tsp Parsley chopped
  • ¼ tsp Ground Black Pepper
  • ½ Cup Parmesan Cheese

Equipment

1 9x13 Baking Dish (The ideal size for layering and baking your casserole evenly.)
1 Large mixing bowl (For combining the egg mixture, bagels, and cheese.)
1 Whisk (Helps blend eggs, milk, and seasonings smoothly)
1 Chef's knife (To slice bagels and chop any mix-ins like bacon or vegetables.)
1 Cutting board (A clean, sturdy surface for prepping your ingredients.)
1 Measuring cups & spoons (Ensures consistent flavor in the egg mixture and topping)
1 Serving Spatula (For portioning and serving the baked casserole neatly.)
1 Aluminum Foil (For covering the dish if the top is browning too quickly.)

Method
 

  1. Fry the bacon and onion in a large skillet over medium-high heat until they are crisp and golden brown. Drain the excess grease on paper towels and set aside. Slice each bagel in half.
    ½ Lb Bacon, ½ Cup Yellow Onion, 6 Each Bagels
  2. Arrange 6 bagel slices in the bottom of a lightly greased 9x13 inch baking dish. Top with the cooked bacon and onion mixture, then sprinkle with Cheddar cheese. Cover with the remaining bagel slices.
    1 Cup Cheddar Cheese
  3. In a medium bowl, whisk eggs, milk, parsley, and pepper. Pour the egg mixture evenly over the bagel layers. Cover and refrigerate for at least 8 hours, or preferably overnight.
    12 Large Eggs, 2 Cups Milk, 2 tsp Parsley, ¼ tsp Ground Black Pepper
  4. Preheat the oven to 400°F. Uncover the chilled casserole dish. Bake for 25-30 minutes, or until the eggs are set and the top is lightly golden brown. Sprinkle with Parmesan cheese and serve immediately.
    ½ Cup Parmesan Cheese

Nutrition

Serving: 12ozCalories: 310kcalCarbohydrates: 13gProtein: 15gFat: 22gSaturated Fat: 9gPolyunsaturated Fat: 6gMonounsaturated Fat: 5gCholesterol: 36mgSodium: 949mgPotassium: 204mgFiber: 2gSugar: 6gVitamin A: 399IUVitamin C: 1mgCalcium: 360mgIron: 2mg

Notes

Here are some tips and tricks for making a delicious Bagel & Cheese Bake:
Ingredient Choices:
  • Bagel Variety: Experiment with different types of bagels! Everything bagels add extra flavor and texture.
  • Cheese: Use a combination of cheeses for a richer flavor profile. Try cheddar, Monterey Jack, Gruyere, or even some crumbled feta.
  • Add-ins: Get creative with add-ins! Consider chopped spinach, diced bell peppers, sautéed mushrooms, or even cooked sausage.
Preparation Tips:
  • Even Layers: Ensure even layers of bagels, cheese, and bacon for consistent baking.
  • Soaking: Letting the bagels soak in the egg mixture for a bit longer (up to 30 minutes) can help them absorb more flavor.
  • Refrigeration: Refrigerating overnight allows the flavors to meld together and makes for easier slicing.
Baking Tips:
  • Baking Time: Monitor closely towards the end of baking to prevent overcooking.
  • Golden Brown: Bake until the top is golden brown and the eggs are set.
  • Resting: Let the casserole rest for a few minutes after baking before serving to allow the flavors to settle.
Serving Suggestions:
  • Garnish: Sprinkle with fresh herbs like chives or parsley before serving.
  • Sides: Serve with fresh fruit, a side salad, or breakfast potatoes.
  • Dipping Sauce: Offer a side of salsa, hot sauce, or your favorite dipping sauce.
Leftovers:
  • Storage: Store leftovers in an airtight container in the refrigerator for up to 3-4 days.
  • Reheating: Reheat individual portions in the microwave or gently in the oven.
By following these tips and tricks, you can create a delicious and satisfying Bagel & Cheese Bake that will be a hit with your family and friends.

Tried this recipe?

Let us know how it was!

🍽️ What to Serve with Bagel & Cheese Breakfast Bake

This savory breakfast casserole is rich, cheesy, and filling—so pairing it with lighter, fresh, or tangy sides is the perfect way to balance your plate. Whether you’re hosting brunch or meal-prepping for the week, these ideas will round out your breakfast beautifully.


🥗 Fresh & Bright Sides

  • Fresh fruit salad – A mix of berries, citrus, or melons adds natural sweetness and color to the plate.

  • Sliced avocado or guacamole – Creamy and satisfying, with a dose of healthy fats.

  • Simple green salad – A light arugula or spinach salad with lemon vinaigrette adds a crisp contrast.


🥓 Savory & Hearty Add-Ons

  • Crispy bacon or sausage links – Add a salty, smoky side to the cheesy casserole.

  • Roasted breakfast potatoes – Seasoned with herbs and baked until crispy for a comforting touch.

  • Grilled tomatoes or sautéed mushrooms – A warm, savory vegetable side to round out the meal.


Drinks That Pair Well

  • Hot coffee or cold brew – Bold coffee pairs perfectly with eggs and cheese.

  • Fresh orange juice or grapefruit juice – Bright and citrusy to cut through the richness.

  • Bloody Mary or mimosa – If you’re serving brunch, these classics are always a hit!

❓ Bagel & Cheese Bake FAQ


Q: Can I make this casserole the night before?
A: Yes! In fact, letting the casserole sit overnight allows the bagels to soak up the egg mixture even better. Simply assemble, cover, and refrigerate. In the morning, bring it to room temperature for 20–30 minutes, then bake as directed.


Q: Do I need to toast the bagels first?
A: Toasting the bagels helps them stay firm and slightly crispy after baking. It’s optional, but recommended—especially if you’re using soft or fresh bagels.


Q: What kind of bagels work best?
A: Plain, everything, onion, and even whole wheat bagels work great. Avoid overly sweet ones (like cinnamon raisin) unless you’re going for a sweet-savory combo.


Q: Can I freeze leftovers?
A: Absolutely. Let the casserole cool completely, then slice into portions. Wrap tightly or store in airtight containers and freeze for up to 2 months. Reheat in the oven or microwave until warmed through.


Q: How do I reheat it without drying it out?
A: Reheat covered in a 325°F oven for 10–15 minutes, or microwave slices with a damp paper towel on top to keep moisture in.


Q: Can I add meat or vegetables?
A: Definitely! Try adding cooked bacon, sausage, ham, or sautéed veggies like spinach, onions, or mushrooms for extra flavor and texture.


Q: Is this recipe vegetarian?
A: Yes, if you skip any meat additions, this bake is totally vegetarian as-is.

Please follow and like us:
onpost_follow
fb-share-icon197
Tweet120
Pinterest20
Share 20
submit to reddit

Sopa De Lima

Sopa De Lima

Ditch the ordinary and dive into a bowl of sunshine with Sopa de Lima—Mexico’s bold and beautiful answer to chicken soup! This is no plain bowl of broth. It’s a flavor fiesta, bursting with tangy lime, tender chicken, warm spices, and the satisfying crunch of crispy tortilla strips.

Each spoonful is like a mini vacation for your taste buds, transporting you straight to the colorful streets of the Yucatán.

Why You’ll Love This Recipe:
🌞 Flavor Fusion – Bright lime meets savory chicken with subtle notes of cinnamon and clove—unexpected, unforgettable, and oh-so-delicious.
🌶️ Comfort Food with a Kick – Warm and soothing, yet lively enough to keep you on your toes.
👩‍🍳 Beginner-Friendly – Exotic flavors, simple steps. You’ll be a sopa superstar in no time!
💪 Healthy & Nourishing – Lean protein, fresh veggies, and a vibrant, feel-good broth.
🎉 Crowd-Pleaser – Great for gatherings or a cozy solo night in. Seconds are basically guaranteed.

So grab your limes, crank up the mariachi music, and bring the magic of Sopa de Lima to your kitchen!

Sopa de Lima

No ratings yet
Sopa de lima is a traditional Mexican soup that originates from the Yucatán Peninsula. It's known for its refreshing and zesty flavor, thanks to the prominent use of lime juice. The soup typically features a light chicken or turkey broth, shredded meat (often turkey), and a blend of vegetables and spices.
Prep Time 10 minutes
Cook Time 45 minutes
Servings: 6 people
Course: Soup, Starter
Cuisine: Mexican
Calories: 139

Ingredients
  

  • 2 Tbsp Olive Oil
  • 2 Roma Tomatoes
  • 1 Large Yellow Onion fine dice
  • 1 Anahiem Pepper
  • ¼ tsp Ground Cinnamon
  • tsp Ground Cloves
  • 2 tsp Kosher Salt
  • 3 Cloves Garlic minced
  • l lbs Chicken Breast boneless & skinless
  • 8 Cups Chicken Broth
  • ½ Cup Lime Juice fresh squeezed
For Topping
  • 1 Corn Tortillas cut into strips and fry
  • 1 Avocado diced

Method
 

  1. Heat the olive oil in a large pot or Dutch oven over medium-high heat. Add the chopped tomatoes, onion, and bell peppers. Cook, stirring occasionally, until the vegetables are softened and slightly caramelized.
  2. Add the ground cinnamon, cloves, and kosher salt to the pot. Stir well to incorporate the spices into the vegetables. Continue cooking for another 5 minutes, allowing the flavors to meld.
  3. Stir in the minced garlic and cook until it becomes aromatic and softens slightly, about 1 minute.
  4. Pour the chicken broth into the pot, then add the chicken breasts. Bring the mixture to a boil over high heat. Once boiling, reduce the heat to low, cover the pot, and simmer for 20 minutes. Remove the pot from the heat.
  5. Remove any foam or impurities from the surface of the soup. Shred the cooked chicken with two forks and set it aside.
  6. Add the shredded chicken back to the pot. Stir in the lime juice. Taste the soup and add more salt if needed.
  7. Now, ladle the steaming soup into bowls and finish with a sprinkle of crispy tortilla strips and some creamy diced avocado. Enjoy!

Nutrition

Serving: 12ozCalories: 139kcalCarbohydrates: 10gProtein: 3gFat: 10gSaturated Fat: 1gPolyunsaturated Fat: 1gMonounsaturated Fat: 7gCholesterol: 6mgSodium: 1961mgPotassium: 360mgFiber: 3gSugar: 4gVitamin A: 310IUVitamin C: 25mgCalcium: 33mgIron: 1mg

Notes

Ingredients:
  • Broth: While chicken broth is most common, you can use turkey broth for a more traditional Yucatecan flavor. Homemade broth will add the most depth.
  • Meat: Shredded chicken is widely used, but turkey is more traditional in the Yucatán. You can use leftover cooked poultry or poach chicken breasts specifically for the soup.
  • Vegetables: The classic base includes tomatoes, onions, and bell peppers. Some recipes also add carrots or jalapeños for a bit of heat.
  • Spices: Oregano is essential. Cumin, cloves, and cinnamon are also common additions.
  • Lime Juice: Freshly squeezed lime juice is key for the signature tart flavor. Use plenty!
  • Tortilla Strips: These add a wonderful crunch. You can use store-bought or make your own by frying or baking corn tortillas.
  • Avocado: Diced avocado is a popular garnish, adding creaminess and a contrasting flavor.
Cooking Tips:
  • Sauté the Vegetables: Don't rush the sautéing of the vegetables. Allow them to soften and develop a bit of sweetness.
  • Bloom the Spices: Cooking the spices briefly in the oil helps to intensify their flavor.
  • Simmer Gently: Simmering the soup allows the flavors to meld and the chicken to become tender.
  • Skim the Broth: Skim off any foam or impurities that rise to the surface of the soup for a clearer broth.
  • Lime Juice at the End: Add most of the lime juice towards the end of cooking to preserve its fresh flavor.
  • Taste and Adjust: Taste the soup before serving and adjust the seasonings (especially salt and lime juice) to your liking.
Serving Suggestions:
  • Garnish: Don't forget the tortilla strips and avocado! Cilantro sprigs and lime wedges are also nice additions.
  • Sides: Sopa de lima is often served with warm tortillas or crusty bread for dipping.
  • Pairings: It's a great starter for heavier Mexican dishes like enchiladas, tacos, or mole.
Variations:
  • Spicy: Add some diced jalapeños or serrano peppers to the soup for extra heat.
  • Vegetarian: Omit the chicken or turkey and use vegetable broth. You can add more vegetables like zucchini or corn.
  • Hearty: Add cooked rice or noodles to the soup for a more filling meal.
With these tips, you'll be able to make a delicious and authentic sopa de lima that captures the essence of Yucatecan cuisine!

Tried this recipe?

Let us know how it was!

Related Recipes

Ingredients

Ingredients:

  • 2 tablespoons olive oil
  • 1 large yellow onion, finely diced
  • 2 Roma tomatoes, chopped
  • 1 Anaheim pepper, seeded and chopped
  • ¼ teaspoon ground cinnamon
  • ⅛ teaspoon ground cloves
  • 2 teaspoons kosher salt
  • 3 cloves garlic, minced
  • 1 pound boneless, skinless chicken breasts
  • 8 cups chicken broth
  • ½ cup freshly squeezed lime juice

For Topping:

  • 1 corn tortilla, cut into strips and fried
  • 1 avocado, diced

Image Gallery Sopa de Lima

Storage & Leftovers

Storing Your Leftover Sopa de Lima:

  • Cool it Down: Before storing, let the soup cool to room temperature. This prevents condensation, which can make the soup watery.
  • The Right Container: Use an airtight container to keep the soup fresh and prevent it from absorbing other flavors in your fridge. 
  • Refrigerator Storage: Store leftover sopa de lima in the refrigerator for 3 to 4 days.
  • Freezer-Friendly: You can freeze it for up to 2 months. For best results, freeze the soup without the toppings, as they might not hold up well in the freezer.

Reheating Tips:

  • Thaw if Frozen: Thaw the soup in the refrigerator overnight or in a bowl of cold water.
  • Stovetop Reheating: Reheat gently in a saucepan over medium-low heat, stirring occasionally.
  • Microwave Reheating: Heat in short bursts, stirring between each burst, until warmed through.  
  • Adjust Consistency: If the soup is too thick after reheating, add a little chicken broth or water to thin it out.

Topping Tips:

  • Tortilla Strips: Store leftover tortilla strips separately in an airtight container at room temperature to maintain their crispiness.
  • Avocado: Add fresh avocado when serving the reheated soup, as it tends to brown quickly.

Extra Tips for Sopa Savvy:

  • Separate Storage: If possible, store the toppings (tortilla strips and avocado) separately from the soup to prevent them from getting soggy.
  • Flavor Boost: When reheating, add a squeeze of fresh lime juice and a sprinkle of fresh cilantro to brighten the flavors.

With these tips, you can enjoy your homemade sopa de lima even days after you’ve made it! 🍲

Please follow and like us:
onpost_follow
fb-share-icon197
Tweet120
Pinterest20
Share 20
submit to reddit

Subscribe for New Recipes

* indicates required

Intuit Mailchimp

White Chicken Chili

White Chicken Chili

Creamy, comforting, and packed with bold flavor, this White Chicken Chili is a delicious twist on the classic. Tender chunks of chicken simmer with white beans, sweet corn, and a medley of warming spices in a rich, creamy broth. It’s hearty, satisfying, and perfect for cozy nights or casual get-togethers.

This recipe isn’t just crave-worthy—it’s versatile, too. You can easily dial up the heat, toss everything in a slow cooker for a hands-off approach, or pile on your favorite toppings like shredded cheese, avocado, lime, and tortilla chips.


Why You’ll Love It:

✔️ Busy weeknights – Quick, simple, and family-friendly
✔️ Feeding a crowd – Makes a big batch and reheats like a dream
✔️ Chilly nights in – The ultimate bowl of comfort
✔️ Totally customizable – Adjust spices, toppings, or even make it dairy-free


Get ready to warm up with a bowl of creamy, soul-soothing White Chicken Chili—your new go-to comfort food!

White Chicken Chili

No ratings yet
White chicken chili is a creamy, comforting twist on traditional chili. It features tender chicken, white beans, and a blend of spices in a rich, flavorful broth. Often simmered with green chiles and corn, it's a delicious and satisfying meal.
Prep Time 15 minutes
Cook Time 20 minutes
Servings: 6 People
Course: Dinner, Main Course
Cuisine: American, Tex-Mex
Calories: 152

Ingredients
  

  • 2 15.5oz Cannellini Beans drained & rinsed.
  • 3 ½ cups Chicken Broth
  • 1 ½ Tbsp Olive Oil
  • 1 Small Yellow Onion
  • 4 Cloves Garlic minced
  • 2 tsp Ground Coriander
  • 1 ½ tsp Ground Cumin
  • 1 tsp Chili Powder
  • 1 tsp Kosher Salt
  • ½ tsp Dried Oregano
  • ½ tsp Ground Black Pepper
  • 1 15oz Yellow Corn
  •  
    2 4oz Green Chiles (canned)
  •  
    1 8oz Cream Cheese dice into small cubes
  • 2 ½ cups Chicken Breast shredded
  • 2 Tbsp Fresh Cilantro chopped
  • 1 Tbsp Lime Juice

Method
 

  1. Take 1 cup of the cooked cannellini beans and 1/2 cup of the chicken broth. In a blender, process these ingredients until they form a smooth puree. Set the puree aside for later use.
    2 15.5oz Cannellini Beans, 3 ½ cups Chicken Broth
  2. Warm the olive oil in a large pot or Dutch oven over medium-high heat. Once the oil is shimmering, add the chopped onion. Sauté the onion for about 3 minutes, stirring occasionally, until it begins to soften. Next, add the minced garlic. Sauté for another 30 seconds, or until the garlic becomes fragrant.
    1 ½ Tbsp Olive Oil, 1 Small Yellow Onion
  3. Now, it's time to add the spices. Sprinkle in the coriander, cumin, chili powder, salt, oregano, and black pepper. Stir the spices into the onion and garlic mixture, and cook for 1 minute. Stir a few times to prevent the spices from burning.
    4 Cloves Garlic, 2 tsp Ground Coriander, 1 ½ tsp Ground Cumin, 1 tsp Chili Powder, 1 tsp Kosher Salt, ½ tsp Dried Oregano, ½ tsp Ground Black Pepper
  4. Next, add the corn and diced green chiles to the pot. Stir to combine with the other ingredients. Cook for 2 minutes, stirring occasionally, to allow the flavors to meld.
    1 15oz Yellow Corn, 2 4oz Green Chiles (canned)
  5. Pour the smooth bean puree and the remaining 3 cups of chicken broth into the pot. Stir to combine the ingredients. Bring the mixture to a boil over medium-high heat. Once boiling, reduce the heat to low, cover the pot partially, and let it simmer gently for 10 minutes.
    1 8oz Cream Cheese
  6. Add the cream cheese to the pot and stir gently until it melts completely and is fully incorporated into the chili.
    2 ½ cups Chicken Breast
  7. Add the remaining cannellini beans and shredded chicken to the pot. Stir gently to combine all the ingredients. Cook for an additional 2 minutes to allow the flavors to meld and the chicken to warm through.
    1 Tbsp Lime Juice
  8. Take the pot off the heat. Stir in the chopped cilantro and lime juice, distributing them evenly throughout the chili. Ladle the chili into bowls and serve hot. Top with tortilla chips, shredded cheese, and diced avocado, if desired.
    2 Tbsp Fresh Cilantro

Nutrition

Serving: 12ozCalories: 152kcalCarbohydrates: 7gProtein: 19gFat: 6gSaturated Fat: 1gPolyunsaturated Fat: 1gMonounsaturated Fat: 4gTrans Fat: 0.01gCholesterol: 54mgSodium: 1944mgPotassium: 443mgFiber: 1gSugar: 2gVitamin A: 134IUVitamin C: 3mgCalcium: 38mgIron: 1mg

Notes

  • 1. Flavor Boosters:
    • Spice It Up: Don't be afraid to experiment with different chiles. Jalapeños, poblanos, or even a touch of chipotle powder can add a kick.
    • Aromatics are Key: Sautéing onions and garlic in oil or butter before adding other ingredients builds a flavorful foundation for your chili.
    • Toast the Spices: Toasting spices like cumin, coriander, and chili powder in a dry pan for a few minutes before adding them to the chili deepens their flavor.
    • Zest It Up: A squeeze of lime juice or a tablespoon of white wine vinegar added at the end brightens the flavors of the chili.
    • Umami Bomb: For an extra layer of savory depth, add a tablespoon or two of white miso paste to the chili.
    2. Chicken:
    • Bone-In, Skin-On for Flavor: Using bone-in, skin-on chicken thighs or breasts adds more flavor to the broth. Just be sure to remove the skin and bones before shredding the chicken.
    • Rotisserie Chicken Shortcut: For a quick and easy option, use a rotisserie chicken.
    • Don't Overcook: Overcooked chicken can be dry. Simmer the chicken until it's just cooked through, then shred it.
    3. Beans:
    • Variety is Key: Use a mix of white beans, such as cannellini, Great Northern, or navy beans, for a variety of textures and flavors.
    • Canned or Dried: Canned beans are convenient, but if you have time, cooking dried beans from scratch adds even more flavor.
    • Smooth Operator: For a creamier chili, puree a portion of the beans before adding them to the pot.
    4. Liquids:
    • Broth Matters: Use a good-quality chicken broth for the best flavor.
    • Adjust as Needed: If the chili becomes too thick, add more broth or water to thin it out.
    5. Toppings:
    • Garnish Generously: Toppings add texture and flavor. Consider shredded cheese, sour cream, avocado, chopped cilantro, tortilla strips, or a dollop of guacamole.
    • Fresh is Best: Freshly chopped cilantro and a squeeze of lime juice added just before serving brighten the flavors.
    Bonus Tip:
    • Slow Cooker Magic: White chicken chili is perfect for the slow cooker. Simply add all the ingredients to the slow cooker and cook on low for 6-8 hours, or until the chicken is cooked through.
    With these tips and tricks, you'll be creating bowls of white chicken chili that are both comforting and bursting with flavor! 

Tried this recipe?

Let us know how it was!

Related Recipes

Ingredients

Ingredients:

  • 2 (15.5-ounce) cans cannellini beans, drained and rinsed
  • 3 ½ cups chicken broth
  • 1 ½ tablespoons olive oil
  • 1 small yellow onion, chopped
  • 4 cloves garlic, minced
  • 2 teaspoons ground coriander
  • 1 ½ teaspoons ground cumin
  • 1 teaspoon chili powder
  • 1 teaspoon kosher salt
  • ½ teaspoon dried oregano
  • ½ teaspoon ground black pepper
  • 1 (15-ounce) can yellow corn, drained
  • 2 (4-ounce) cans chopped green chiles
  • 1 (8-ounce) package cream cheese, cut into small cubes
  • 2 ½ cups shredded cooked chicken breast
  • 2 tablespoons chopped cilantro
  • 1 tablespoon lime juice

Image Gallery White Chicken Chili

Storage & Leftovers

Storing Your Leftover White Chicken Chili:

  • Cool Down: Allow the chili to cool to room temperature before storing. This prevents condensation, which can water down the chili.
  • Proper Container: Use an airtight container to maintain freshness and prevent the chili from absorbing other flavors in your fridge.  
  • Refrigerator Storage: Store leftover white chicken chili in the refrigerator for up to 4 days.
  • Freezer-Friendly: You can freeze it for up to 3 months.  

Reheating Tips:

  • Thaw if Frozen: If frozen, thaw the chili in the refrigerator overnight or in a bowl of cold water. 
  • Stovetop Reheating: Reheat gently in a saucepan over medium-low heat, stirring occasionally. You might need to add a little chicken broth or water to thin it out. 
  • Microwave Reheating: Heat in short bursts, stirring between each burst, until warmed through.

Extra Tips for Chili Connoisseurs:

  • Cream Cheese Consideration: If you’ve frozen the chili, the cream cheese might separate slightly upon thawing. Just give it a good stir when reheating, and it should come back together.
  • Flavor Revival: When reheating, add a squeeze of fresh lime juice and a sprinkle of fresh cilantro to brighten the flavors.
  • Spice Adjustment: If you want to adjust the spice level when reheating, add more chili powder or a pinch of cayenne pepper for extra heat.

With these tips, you can enjoy your homemade white chicken chili even days after you’ve made it!

Please follow and like us:
onpost_follow
fb-share-icon197
Tweet120
Pinterest20
Share 20
submit to reddit

Subscribe for New Recipes

* indicates required

Intuit Mailchimp

Italian Meatball Soup

Italian Meatball Soup

Warm, hearty, and full of classic Italian flavor, this Italian Meatball Soup is the ultimate comfort food for chilly nights. Juicy, tender meatballs made with ground beef, Parmesan, breadcrumbs, and herbs are simmered in a rich tomato-based broth alongside pasta and vegetables, creating a soul-satisfying dish the whole family will love.

This one-pot wonder is as cozy as it is customizable. Use pasta shapes like conchiglie or ditalini for a satisfying bite, and toss in your favorite veggies—spinach, zucchini, or kale all work beautifully. It’s a perfect weeknight meal that tastes like it’s been simmering all day.

Whether you’re feeding a hungry family or craving a cozy bowl of homemade goodness, this Italian Meatball Soup delivers comfort by the spoonful.

Italian Meatball Soup

No ratings yet
Italian Meatball Soup is a comforting classic! Tender meatballs, a rich tomato broth, and your favorite pasta combine for a hearty and flavorful meal. It's easy to make and perfect for chilly evenings.
Prep Time 15 minutes
Cook Time 25 minutes
Servings: 6 People
Course: Appetizer, Dinner, Lunch, Main Course
Cuisine: Italian American
Calories: 692

Ingredients
  

Meatballs
  • 1 lb Ground Beef
  • 4 Cloves Garlic Minced
  • 2 Tbsp Parsley Chopped
  • 2 Tbsp Yellow Onion Grated
  • ½ Cup Italian Breadcrumbs
  • 1 Tbsp Tomato Paste
  • 1 Large Egg
  • 1 tsp Salt
  • ½ tsp Black Pepper
Soup
  • 2 Tbsp Olive Oil
  • ¾ Cup Yellow Onion Chopped
  • 4 Cloves Garlic Minced
  • 1 Tbsp Tomato Paste
  • 36 oz Marinara Sauce
  • ½ tsp Fennel Seeds Crushed
  • 1 Pinch Crushed Red Pepper Flakes
  • 32 oz Vegetable Broth or Chicken Broth
  • 8 oz Conchiglie Pasta
For Service
  • 1 Loaf Sourdough

Method
 

Making the meatballs
  1. In a medium-sized bowl, add the breadcrumbs, grated onions, parsley, garlic, egg, salt, and pepper. Do not add the ground beef yet. Use a fork to thoroughly mix the ingredients together until they are evenly distributed and well combined. This mixture will help to bind the meatballs and add flavor.
    4 Cloves Garlic, 2 Tbsp Parsley, 2 Tbsp Yellow Onion, 1/2 Cup Italian Breadcrumbs, 1 Large Egg, 1 tsp Salt, 1/2 tsp Black Pepper, 1 Tbsp Tomato Paste
  2. Add the ground beef to the bowl with the other meatball ingredients. Use your hands or a fork to gently incorporate the ground beef into the mixture. Be careful not to overwork the mixture, as this can make the meatballs tough. Mix just until the ground beef is evenly distributed throughout the other ingredients.
    1 lb Ground Beef
  3. Use a tablespoon or a cookie scoop to measure out the meatball mixture. Roll each portion between your palms to form meatballs that are about 1 inch in diameter. You should end up with approximately 30-32 meatballs. Place the shaped meatballs on a plate or baking sheet lined with parchment paper. This will prevent them from sticking. Set the meatballs aside while you prepare the sauce.
Cooking the meatballs
  1. Heat the olive oil in a large Dutch oven or pot over medium heat. Once the oil is hot, add half of the meatballs to the pot, making sure they are in a single layer and not overcrowded. Cook the meatballs, turning them occasionally with a spoon or tongs, until they are browned on all sides. This should take about 6 minutes. Don't worry if the meatballs aren't fully cooked through at this point; they will finish cooking later in the soup. Remove the browned meatballs from the pot and set them aside. Repeat the process with the remaining meatballs.
    2 Tbsp Olive Oil
  2. Once all the meatballs are browned, you can choose to drain off some of the excess grease from the pot. Carefully tilt the pot and use a spoon to remove most of the grease, leaving about 1 teaspoon of oil in the pot for flavor. If you're browning the meatballs in batches, repeat the browning process with the remaining meatballs. Add more oil to the pot if necessary. Set the cooked meatballs aside for now.
Build the soup
  1. Add the remaining olive oil to the pot and heat over medium heat. Once the oil is hot, add the chopped onions to the pot. Sauté the onions for about 5 minutes, stirring occasionally, until they become translucent and softened. Then, add the minced garlic to the pot. Cook the garlic for another 30 seconds, or until it becomes fragrant, being careful not to let it burn.
    ¾ Cup Yellow Onion, 4 Cloves Garlic
  2. Add the tomato paste to the pot with the onions and garlic. Stir in the red pepper flakes and the crushed fennel seeds, if you are using them. Sauté the mixture for about 30 seconds, stirring constantly, to allow the flavors of the tomato paste and spices to meld and intensify.
    1 Tbsp Tomato Paste, 1 Pinch Crushed Red Pepper Flakes, 1/2 tsp Fennel Seeds
  3. Now it's time to add the liquid to the pot. Pour in your favorite marinara sauce, the chicken broth, and 1 cup of water. Stir the mixture well to combine the flavors of the tomato paste, spices, and broth. Bring the mixture to a rolling boil over medium-high heat.
    36 oz Marinara Sauce, 32 oz Vegetable Broth
  4. It's time to reintroduce the meatballs! Carefully add the cooked meatballs back to the pot with the sauce and broth. Reduce the heat to medium and bring the mixture to a gentle simmer. Allow the meatballs to simmer in the sauce, which will allow them to finish cooking and absorb the flavors of the broth and spices.
  5. Add the pasta to the pot with the meatballs and sauce. Cook the pasta for 10-12 minutes, or until it is tender but still has a slight bite to it. Be sure to stir the soup occasionally to prevent the pasta from sticking to the bottom of the pot. If the soup seems too thick, you can add up to 1 cup of water to thin it out. If you do add water, make sure to bring the soup back to a boil to ensure that the pasta is cooked through.
    8 oz Conchiglie Pasta
  6. Taste the soup and season it to your liking with salt and pepper. You may also want to add a pinch of red pepper flakes for a touch of heat. Ladle the soup into bowls and garnish with a sprinkle of fresh parsley for a touch of color and freshness. Serve the soup hot with slices of crusty bread on the side. The bread is perfect for dipping into the flavorful broth and soaking up all the delicious flavors.
    1 Loaf Sourdough

Nutrition

Serving: 10ozCalories: 692kcalCarbohydrates: 99gProtein: 35gFat: 16gSaturated Fat: 4gPolyunsaturated Fat: 2gMonounsaturated Fat: 6gTrans Fat: 0.3gCholesterol: 78mgSodium: 2551mgPotassium: 1129mgFiber: 10gSugar: 20gVitamin A: 1621IUVitamin C: 14mgCalcium: 150mgIron: 7mg

Notes

Ingredients:
  • Meatballs: Use a combination of ground beef, pork, or veal for the meatballs. You can also use ground turkey or chicken for a leaner option.
  • Breadcrumbs: Use fresh breadcrumbs for the best texture. You can also use dried breadcrumbs, but make sure to soak them in milk or water before adding them to the meatball mixture.
  • Cheese: Parmesan cheese adds a salty and savory flavor to the meatballs. You can also use other grated cheeses, such as Pecorino Romano or Asiago.
  • Seasonings: Italian seasoning, garlic powder, onion powder, salt, and pepper are essential for flavoring the meatballs. You can also add other herbs and spices, such as oregano, basil, or red pepper flakes.
  • Broth: Use a good quality chicken or beef broth. You can also use vegetable broth for a vegetarian option.
  • Pasta: Small pasta shapes like conchiglie (shells), ditalini, or orzo work well in this soup.
  • Vegetables: You can add a variety of vegetables to the soup, such as onions, carrots, celery, spinach, kale, or zucchini.
Cooking Tips:
  • Don't Overmix the Meatballs: When mixing the meatball ingredients, be careful not to overmix. This can make the meatballs tough.
  • Brown the Meatballs: Browning the meatballs before adding them to the soup adds flavor and helps them hold their shape.
  • Simmer Gently: Simmer the soup gently to prevent the meatballs from falling apart.
  • Cook Pasta Separately: Cook the pasta separately and add it to the soup at the end. This will prevent the pasta from becoming mushy.
  • Adjust Consistency: If the soup is too thick, add more broth or water. If it's too thin, simmer it uncovered for a few minutes to reduce the liquid.
  • Taste and Adjust: Taste the soup before serving and adjust the seasonings as needed.
Serving Suggestions:
  • Garnish: Garnish with fresh parsley, grated Parmesan cheese, or a drizzle of olive oil.
  • Sides: Serve with crusty bread or a side salad for a complete meal.
Variations:
  • Spicy: Add a pinch of red pepper flakes to the meatballs or the soup for heat.
  • Vegetarian: Use a plant-based meat substitute for the meatballs and vegetable broth for the soup.
  • Beans: Add a can of drained and rinsed cannellini beans or chickpeas to the soup for extra protein and fiber.
With these tips, you'll be able to create a delicious and satisfying Italian Meatball Soup that's perfect for any occasion!

Tried this recipe?

Let us know how it was!

Related Recipes

Ingredients

Ingredients:

  • For the Meatballs:

    • 1 lb ground beef
    • 4 cloves garlic, minced
    • 2 tablespoons parsley, chopped
    • 2 tablespoons yellow onion, grated
    • ½ cup Italian breadcrumbs
    • 1 tablespoon tomato paste
    • 1 large egg
    • 1 teaspoon salt
    • ½ teaspoon black pepper
  • For the Soup:

    • 2 tablespoons olive oil
    • ¾ cup yellow onion, chopped
    • 4 cloves garlic, minced
    • 1 tablespoon tomato paste
    • 36 oz marinara sauce
    • ½ teaspoon fennel seeds, crushed
    • 1 pinch red pepper flakes
    • 32 oz vegetable broth or chicken broth
    • 8 oz conchiglie pasta (or other small pasta)
  • For Serving:

    • 1 loaf sourdough bread

Image Gallery Italian Meatball Soup

Storage & Leftovers

Storing:

  • Cool Down: Allow the soup to cool completely before storing. This helps prevent condensation and bacterial growth.
  • Airtight Container: Transfer the cooled soup to an airtight container or a freezer-safe bag.
  • Refrigerate: Store the container in the refrigerator for up to 3-4 days.  
  • Freeze: For longer storage, you can freeze the soup for up to 2-3 months. 

Reheating:

  • Stovetop: Reheat the soup gently in a saucepan over medium heat, stirring occasionally, until heated through.
  • Microwave: If using the microwave, reheat in short bursts, stirring in between, to prevent overheating and ensure even heating.

Tips for Best Quality:

  • Separate Pasta: If you added pasta to the soup, it’s best to store it separately from the broth and meatballs. This will prevent the pasta from becoming mushy when reheated.
  • Add Fresh Herbs: When reheating, add a sprinkle of fresh parsley or other herbs to brighten the flavors.
  • Adjust Consistency: If the soup has thickened after refrigeration, you can add a little broth or water to thin it out when reheating.

Using Leftovers:

  • Meatball Sandwiches: Use leftover meatballs to make meatball sandwiches. 
  • Pasta Sauce: Use the leftover soup as a base for a pasta sauce. 
  • Stuffed Peppers: Stuff bell peppers with the meatball mixture and bake.  

By following these tips, you can ensure that your Italian Meatball Soup stays delicious and satisfying, even as leftovers!

Please follow and like us:
onpost_follow
fb-share-icon197
Tweet120
Pinterest20
Share 20
submit to reddit


Subscribe for New Recipes

* indicates required

Intuit Mailchimp

Creamy Alfredo Sauce

Creamy Alfredo Sauce

Get ready to unleash your inner culinary rockstar and whip up a batch of creamy Alfredo sauce that will make your taste buds sing! This isn’t just any sauce, folks; it’s a symphony of flavor, a creamy concerto for your palate.

First, we’ll melt some buttery goodness in a pan—a golden pool of deliciousness. Then, in goes the garlic, sizzling and dancing in the heat, releasing its aromatic magic. (Careful not to burn it, or your garlic will stage a bitter protest!)

Next, we’ll bring in the heavy cream, a velvety cascade of richness. Whisk it all together like a maestro conducting an orchestra, creating a harmonious blend of flavors.

Now, for the grand finale: a shower of Parmesan cheese! Watch as it melts into the creamy embrace of the sauce, transforming into a luscious, velvety dream.

And there you have it—a creamy Alfredo sauce so good, it’ll have you shouting “Encore!” Get ready to twirl your pasta and savor every drop of this culinary masterpiece. You’ve earned it, chef!

Creamy Alfredo Sauce

No ratings yet
Indulge in the luxurious taste of Alfredo sauce, a creamy Italian creation that elevates any pasta dish. This rich blend of butter, heavy cream, and Parmesan cheese creates a velvety smooth texture and savory flavor that's simply irresistible. Imagine it coating each strand of fettuccine or linguine, offering a decadent experience in every bite.
Prep Time 5 minutes
Cook Time 12 minutes
Servings: 4 cups
Course: Main Course
Cuisine: American, Italian, Italian American
Calories: 658

Ingredients
  

  • 6 tbsp Butter
  • 1 tsp Garlic
  • cups Heavy cream
  • oz Parmesan Cheese
  • 1 tsp Salt
  • 1 tsp Black pepper
  • 1 tbsp Thyme dried

Method
 

  1. Measure out your butter, ensuring it's softened for easier melting. Finely mince your garlic cloves. Have your heavy cream ready in a convenient pouring container. Grate your Parmesan cheese and keep it nearby.
    6 tbsp Butter, 1½ cups Heavy cream, 1 tsp Garlic
  2. Place a saucepan (medium size works well) over medium-low heat. Add the butter and allow it to melt completely, swirling the pan occasionally for even melting.
    6 tbsp Butter, 1 tsp Garlic
  3. Add the minced garlic and a pinch of dried thyme (about ¼ to ½ teaspoon) to the melted butter. Stir it frequently and sauté until the garlic becomes fragrant and turns a light golden brown color. Be careful not to burn the garlic, as this will impart a bitter flavor. The thyme will infuse its flavor into the butter and garlic as they cook.
    1 tsp Garlic, 1 tbsp Thyme
  4. Take the saucepan off the heat and let it cool for about 3-5 minutes. This brief cooling period is essential to prevent the cream from curdling when you add it in the next step.
  5. Slowly pour the heavy cream into the saucepan while whisking constantly. This gradual addition and continuous whisking will create a smooth emulsion and prevent the sauce from separating. Continue whisking until the cream is fully blended with the butter and garlic.
    1½ cups Heavy cream
  6. Place the saucepan back on the stove over low heat. Now, gradually add the grated Parmesan cheese, a handful at a time, whisking continuously as you do so. This slow addition and constant whisking will ensure the cheese melts evenly into the sauce, creating a luscious, creamy texture.
    6½ oz Parmesan Cheese
  7. Continue to cook the sauce over low heat, stirring occasionally, until it reaches your desired consistency. If it becomes too thick, you can thin it out with a tablespoon or two of warm milk or pasta water.
  8. Have a taste! You might want to add a pinch of salt and freshly ground black pepper to enhance the flavors. Some people like a touch of nutmeg in their Alfredo sauce as well.
    1 tsp Black pepper , 1 tsp Salt
  9. Once the cheese is completely melted, the sauce is smooth, and the seasoning is perfect, remove the pan from the heat. Your homemade Alfredo sauce is ready to be tossed with your favorite pasta, like fettuccine, linguine, or even tortellini! Garnish with some fresh parsley and extra Parmesan cheese for a beautiful presentation.

Nutrition

Serving: 8ozCalories: 658kcalCarbohydrates: 10gProtein: 17gFat: 63gSaturated Fat: 39gPolyunsaturated Fat: 3gMonounsaturated Fat: 16gTrans Fat: 1gCholesterol: 188mgSodium: 1996mgPotassium: 199mgFiber: 0.3gSugar: 3gVitamin A: 2337IUVitamin C: 4mgCalcium: 482mgIron: 1mg

Notes

1. Quality Ingredients are Key
  • Freshly Grated Parmesan: Use a block of Parmesan cheese and grate it yourself. Pre-grated cheese often contains cellulose, which can make the sauce grainy. 
  • Good Butter: Use a high-quality butter for the best flavor.
  • Fresh Garlic: If possible, use fresh garlic cloves instead of garlic powder for a more robust flavor.
2. Temperature Control is Crucial
  • Low and Slow: Cook the sauce over low heat to prevent the cream from curdling or the sauce from becoming too thick.
  • Cool Slightly Before Adding Cream: Taking the pan off the heat for a few minutes after sautéing the garlic will help prevent the cream from separating.
3. Technique Matters
  • Whisk Continuously: Whisk the cream and cheese into the sauce gradually and continuously to ensure a smooth, lump-free consistency.
  • Don't Overcook: The sauce is ready when the cheese is melted and the sauce is smooth. Overcooking can make it thick and oily.
4. Adjust as Needed
  • Thin it Out: If the sauce becomes too thick, add a tablespoon or two of warm milk or pasta water to thin it out.
  • Season to Taste: Don't forget to season with salt and freshly ground black pepper to your liking. A pinch of nutmeg can also add a lovely warmth.
5. For Extra Richness and Flavor
  • Add Cream Cheese: A tablespoon or two of cream cheese whisked in with the Parmesan can add extra richness and tang.
  • A Touch of Wine: A splash of dry white wine, like Sauvignon Blanc or Pinot Grigio, can add complexity and depth of flavor.
  • Finish with Fresh Herbs: Stir in some chopped fresh parsley or basil at the end for a burst of freshness and color.
Bonus Tip: For the ultimate creamy Alfredo experience, toss the cooked pasta directly into the sauce and cook for a minute or two to allow the pasta to absorb the flavors.

Tried this recipe?

Let us know how it was!

Related Recipes

Ingredients

Ingredients:

  • 6 tablespoons butter
  • 1 teaspoon minced garlic
  • 1 ½ cups heavy cream
  • 6.5 ounces grated Parmesan cheese (about 1 ½ cups)
  • 1 teaspoon salt
  • 1 teaspoon black pepper
  • 1 tablespoon dried thyme

Image Gallery Creamy Alfredo Sauce

Storage & Leftovers

Storing Your Leftover Alfredo Sauce:

  • Cool it Down: Before storing, let the sauce cool to room temperature. This prevents condensation from forming in the container, which can lead to spoilage.
  • Choose the Right Container: An airtight container is essential to maintain the quality and prevent the sauce from absorbing odors from other foods in your fridge. Glass containers or high-quality plastic containers with tight-fitting lids work well. 
  • Refrigerator Storage: Store your leftover Alfredo sauce in the refrigerator for 3 to 4 days.
  • Freezer Storage: For longer storage, you can freeze Alfredo sauce for up to 3 months. It’s best to freeze it in smaller portions for easier thawing and use. Consider using freezer-safe bags (laid flat to save space) or small airtight containers.   

Reheating Tips:

  • Thaw Safely: If frozen, thaw the sauce in the refrigerator overnight or in a bowl of cold water.
  • Gentle Reheating: Reheat the sauce gently over low heat on the stovetop, stirring frequently. Alternatively, you can reheat it in the microwave in short bursts, stirring between each burst, until warmed through.
  • Thin if Needed: Alfredo sauce tends to thicken upon cooling and reheating. If it’s too thick, you can thin it out with a little warm milk, cream, or pasta water.  

Creative Ways to Use Leftover Alfredo Sauce:

Don’t let those precious leftovers go to waste! Here are some ideas:

  • Alfredo Dip: Serve it warm as a dip for breadsticks, vegetables, or even chicken strips.
  • Pizza Topping: Use it as a base for a white pizza with your favorite toppings.
  • Pasta Bake: Incorporate it into a creamy pasta bake with chicken, vegetables, or seafood. 
  • Soup Enhancer: Stir a spoonful or two into your favorite soup for extra creaminess and flavor.
  • Vegetable Gratin: Use it to make a creamy and cheesy vegetable gratin.

With these tips, you can enjoy your homemade Alfredo sauce to the fullest, even days after you’ve made it!

Please follow and like us:
onpost_follow
fb-share-icon197
Tweet120
Pinterest20
Share 20
submit to reddit