Breakfast Crunchwrap Casserole
Wake-Up Worthy: Crunchwrap Breakfast Casserole
Crispy tortillas, fluffy eggs, seasoned sausage, and gooey cheese come together in this irresistible breakfast casserole inspired by the iconic crunchwrap.
If you love the satisfying crunch and savory goodness of a classic breakfast crunchwrap, you’re in for a real treat. This Breakfast Crunchwrap Casserole brings together all the bold flavors you crave—fluffy scrambled eggs, crispy sausage, melty cheddar cheese, and golden tortillas—into one warm and irresistible baked dish.
Rather than assembling individual wraps, you simply layer the ingredients, pop the casserole in the oven, and let the magic happen. As a result, you get a dish that’s crispy on top, cheesy in the middle, and perfect for feeding a hungry crowd. Even better, it’s incredibly easy to prepare and works beautifully for weekend brunch, holiday mornings, or busy weekdays when meal prep is key.
This breakfast casserole is quick to assemble, made with affordable, everyday ingredients, and delivers the perfect blend of crunchy, creamy, and cheesy in every bite. It’s also endlessly customizable—feel free to swap in your favorite meats, cheeses, or spices to make it your own. Because of its flexibility, make-ahead convenience, and Tex-Mex flavor, it’s a guaranteed crowd-pleaser that will have everyone asking for seconds.
Whether you’re hosting brunch, prepping for the week, or just craving something comforting and fun, this Breakfast Crunchwrap Casserole checks all the boxes—and then some.
⭐ Why This Breakfast Crunchwrap Casserole Is So Awesome:
🧀 All Your Favorites in One Dish – Eggs, sausage, cheese, and crispy tortillas all baked into one mouthwatering casserole.
⏱️ Time-Saving & No Wrapping Needed – Skip the individual crunchwrap assembly and bake everything together in a single dish.
👨👩👧👦 Feeds a Hungry Crowd – Perfect for family brunches, weekend get-togethers, or holiday mornings.
🔁 Make-Ahead & Meal Prep Friendly – Assemble the night before and bake in the morning, or portion and reheat throughout the week.
🌶️ Totally Customizable – Use bacon, chorizo, or go vegetarian. Swap cheeses, add salsa, or spice it up with jalapeños!
🥑 Pairs with All the Good Stuff – Add avocado, hot sauce, sour cream, or fresh pico for a Tex-Mex breakfast explosion.
🧼 Minimal Cleanup – Fewer dishes than traditional crunchwraps = more time to relax and eat!
🎉 Guaranteed Crowd-Pleaser – Crunchy, cheesy, and full of bold flavor—it disappears fast at every table!
🔪 How to Make Breakfast Crunchwrap Casserole
Prep the Tortillas
Cut large flour tortillas into triangles and lightly toast or crisp them in the oven or skillet.
Cook the Fillings
Brown your sausage (or bacon/chorizo), scramble the eggs, and season with salt and pepper.
Make the Cheese Sauce (Optional)
For extra creaminess, mix shredded cheese with a little milk or sour cream in a bowl.
Layer the Casserole
In a greased baking dish, layer crispy tortilla pieces, scrambled eggs, sausage, shredded cheese (or sauce), and repeat. Top with more tortilla triangles and cheese.
Bake to Perfection
Bake at 375°F (190°C) for 20–25 minutes, or until golden and bubbly.
Garnish & Serve
Top with chopped green onions, avocado, sour cream, or your favorite salsa. Slice and serve hot!
Jump to Section
📱 Follow Us
📬 Subscribe for Updates

Breakfast Crunch Wrap Casserole
Ingredients
 10 Hash Browns frozen patties
- 1 Lb Breakfast Sausage pork sausage roll
- ⅓ Cup Salsa jarred, plus more for serving
- ⅔ Cup Sour Cream
- 1 Tbsp Jalapeno Peppers pickled, finely chopped
- 3 Tbsp Butter melted, divided
- 6 Flour Tortillas 12"
- 1 Tbsp Butter
- 10 Large Eggs
- 1 Tbsp Water
- 1 tsp Kosher Salt
- ½ tsp Ground Black Pepper freshly ground
- 2 Cups Cheddar Cheese shredded


Equipment


Method
- Preheat your oven to 425°F (220°C). Line a baking sheet with parchment paper to prevent sticking and make cleanup easier. Arrange your frozen hash brown patties in a single layer on the prepared baking sheet, ensuring they have some space to crisp up evenly. Bake them in the preheated oven for 20 to 25 minutes, flipping each patty halfway through to achieve a beautiful golden brown and crispy texture on both sides. Once the hash browns are cooked to perfection, reduce the oven temperature to 375°F (190°C) to prepare for baking the casserole.10 Hash Browns
- While the hash browns are baking, heat a large skillet over medium-high heat. Add your sausage to the skillet and cook, stirring occasionally, until it is browned and crumbly, about 5-7 minutes. Once the sausage is cooked through, drain off any excess grease.1 Lb Breakfast Sausage
- In a small bowl, combine your salsa, sour cream, and jalapeños. Give it a good stir to make sure everything is evenly distributed, then set it aside. This will be your flavorful topping for the casserole later on!⅔ Cup Sour Cream, 1 Tbsp Jalapeno Peppers, ⅓ Cup Salsa
- Begin by melting a tablespoon of butter and using a pastry brush to evenly coat the bottom and sides of your casserole dish. This will help the tortillas stick and add a delicious buttery flavor. Next, arrange five tortillas in the bottom of the prepared casserole dish, overlapping them slightly to create a snug fit that covers the entire bottom. Allow the edges of the tortillas to drape over the sides of the dish, which will create a crispy tortilla crust once the casserole is baked. Finally, spread the cooked, crumbled sausage evenly over the layer of tortillas to form the savory base of your casserole.3 Tbsp Butter, 6 Flour Tortillas
- First, melt a tablespoon of butter in a large nonstick skillet over medium heat. In a separate bowl, whisk together eggs, water, salt, and pepper until well combined. Pour the egg mixture into the heated skillet and cook, stirring constantly, until the eggs are set and soft-scrambled, about 3 minutes. Once cooked, spread the scrambled eggs evenly over the sausage layer in the casserole dish.1 Tbsp Butter, 10 Large Eggs, 1 Tbsp Water, 1 tsp Kosher Salt, ½ tsp Ground Black Pepper
- Now it's time to layer those delicious toppings! Drizzle half of the reserved sour cream mixture over the eggs for a creamy, tangy flavor, followed by three-quarters of a cup of your favorite shredded cheese. Next, arrange the crispy hash browns evenly over the cheese, adding a hearty element to your casserole. Sprinkle the remaining cheese over the hash browns for a golden, crispy top. Take the remaining tortilla and place it in the center of the dish. Gently fold the overlapping tortillas over the center tortilla, pressing down slightly to seal the edges and create a closed, burrito-like shape. Brush the top with the remaining melted butter, which will help the tortillas brown and crisp up in the oven. Finally, gently press down on the folded tortillas to help the edges stick together and create a tight seal, preventing the filling from spilling out during baking.⅔ Cup Sour Cream, 2 Cups Cheddar Cheese
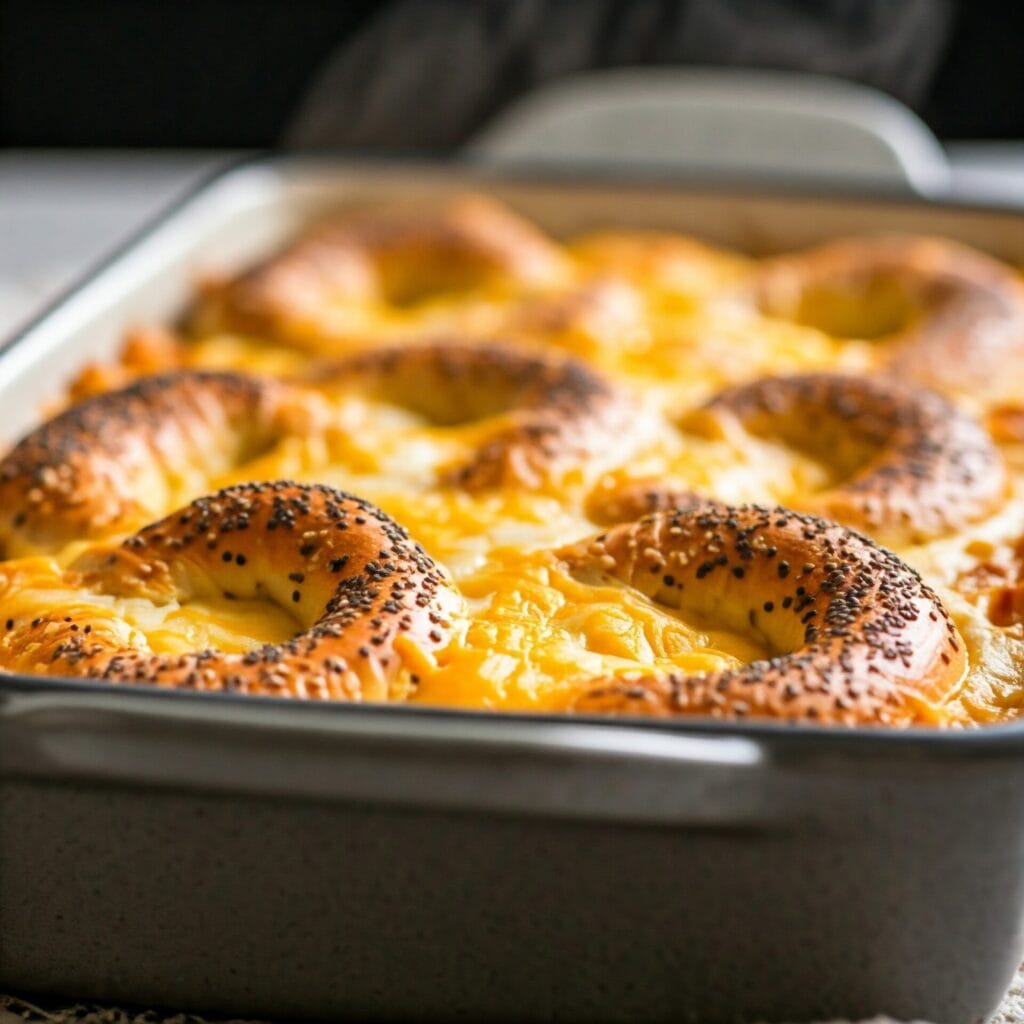
- With all the delicious layers assembled, bake your masterpiece in the preheated 375°F oven until the top is toasted to a beautiful golden brown, about 25 to 30 minutes. Once baked, carefully place a large platter or board over the casserole dish and, with a swift motion, invert the casserole onto the board for a stunning presentation. Cut the casserole into squares and serve it up! Don't forget to offer the remaining sour cream sauce and extra salsa on the side for those who want an extra kick of flavor. Enjoy!⅓ Cup Salsa
Nutrition
Notes
- Don't overcrowd the pan: Give those hash browns some space to breathe! Overcrowding the baking sheet prevents proper air circulation and can lead to soggy patties.
- Consider par-baking: If you want super crispy hash browns, par-bake them for about 10 minutes before adding them to the casserole. This will help them stay crispy even after being layered with other ingredients.
- Try different hash browns: Experiment with different types of frozen hash browns, like shredded or waffle-cut, for a varied texture.
- Spice it up: Add a pinch of chili powder or cayenne pepper to the scrambled eggs for an extra kick.
- Get creative with the meat: Instead of sausage, try ground beef, chorizo, or even a plant-based meat substitute.
- Boost the veggies: Sauté some onions and peppers with the meat for added flavor and nutrients.
- Warm the tortillas: Warm the tortillas slightly before layering them in the casserole dish. This will make them more pliable and less likely to tear.
- Don't overfill: Be careful not to overfill the casserole, as this can make it difficult to fold and seal the tortillas.
- Secure the edges: Use toothpicks to secure the tortilla edges if you're having trouble keeping them sealed.
- Let it rest: Allow the casserole to rest for a few minutes after baking before cutting and serving. This will help the filling set and prevent it from being too runny.
- Make it ahead: Assemble the casserole the night before and bake it in the morning for a quick and easy breakfast.
- Reheat with care: Reheat leftovers gently in the oven or microwave to avoid overcooking the eggs.
Tried this recipe?
Let us know how it was!🍽️ What to Serve with Breakfast Crunchwrap Casserole
🥑 Fresh & Zesty Sides
Avocado slices or guacamole – Creamy and cooling, perfect with Tex-Mex flavor
Pico de gallo or fresh tomato salsa – Adds freshness and a tangy bite
Sour cream or crema – For that rich, cooling contrast
Fresh fruit salad – Brightens the plate and balances the richness
🧂 Dippable & Crispy Sides
Crispy hash browns or home fries – A must-have potato side!
Air fryer tater tots – Fun and kid-friendly
Tortilla chips & queso – Great for dipping or extra crunch
🌮 Complementary Dishes
Mini breakfast tacos – For guests who want variety on their plate
Chorizo or bacon-wrapped jalapeño poppers – Bring on the heat!
Refried beans or black beans – A hearty, flavorful side
🍹 Drinks to Pair
Fresh orange juice or mimosas – For a brunch vibe
Iced coffee or cold brew – Strong, chilled, and perfect with savory food
Horchata or agua fresca – A sweet, refreshing contrast


❓ Breakfast Crunchwrap Casserole FAQ
Q: Can I make this casserole ahead of time?
A: Yes! You can fully assemble the casserole the night before, cover it, and refrigerate. When ready to bake, just remove it from the fridge 15–20 minutes beforehand and bake as directed.
Q: How do I store leftovers?
A: Store any leftovers in an airtight container in the refrigerator for up to 4 days. Reheat individual portions in the microwave or oven until warmed through.
Q: Can I freeze this casserole?
A: Absolutely. Let it cool completely, then wrap tightly or portion into freezer-safe containers. Freeze for up to 2 months. Thaw in the fridge overnight before reheating.
Q: What other proteins can I use?
A: This recipe works great with bacon, ground turkey, chorizo, or even plant-based sausage for a vegetarian option.
Q: How can I make it spicy?
A: Add chopped jalapeños, use pepper jack cheese, or drizzle hot sauce or chipotle crema before baking for a spicy kick.
Q: Can I make this gluten-free?
A: Yes! Just use gluten-free tortillas and double-check that your sausage and cheese are certified gluten-free.
Q: What’s the best cheese to use?
A: Sharp cheddar is a classic choice, but feel free to mix in Monterey Jack, pepper jack, or even a little cream cheese for extra richness.