Buffalo Cauliflower Wings

Cauliflower Wings with a Kick – Buffalo Style!

Spicy, crispy, and totally addictive—these Buffalo cauliflower wings are the ultimate crowd-pleasing snack! 

Craving the ultimate plant-based snack that’s bold, crispy, and full of flavor? These Buffalo Cauliflower Wings are the spicy, satisfying treat you’ve been searching for. Whether you’re throwing a game day bash, prepping party appetizers, or simply want to elevate your weekday meals, this easy recipe delivers big on flavor—without the meat.

Instead of traditional chicken wings, this version features tender cauliflower florets that are oven-baked or air-fried until perfectly crisp. As a result, you get a bite that’s crunchy on the outside, tender on the inside, and absolutely packed with bold Buffalo spice.

In addition, the ingredients are simple and likely already in your kitchen. Moreover, the method is easy enough for beginners, yet tasty enough to win over even the most devoted wing lovers. For example, you can adjust the heat level by using mild or extra-hot sauce, depending on your preference.

Because these wings are so versatile, they work for nearly any occasion. Serve them with ranch or blue cheese dip, plus a side of celery and carrots for that classic presentation. Therefore, whether you’re hosting friends, meal prepping for the week, or just feeding your own spicy cravings, this recipe is sure to impress.

In conclusion, Buffalo Cauliflower Wings are everything a great appetizer should be—crispy, flavorful, and absolutely addictive. Once you try them, you may never go back to chicken again.

💥 Why You’ll Love These Buffalo Cauliflower Wings

🔥 Bold Buffalo FlavorAs a result, every bite is spicy, tangy, and totally addictive.
🥦 Plant-Based & Vegan-FriendlyMoreover, it’s a satisfying meatless option for everyone.
Crispy Without FryingInstead of deep-frying, it’s oven-baked or air-fried for crunch without grease.
🧄 Simple Pantry IngredientsIn fact, you likely already have everything in your kitchen.
⏱️ Quick & Easy PrepBecause of that, it’s perfect for weeknights or spontaneous gatherings.
🍽️ Crowd-Pleasing Snack or AppetizerFor example, serve it at parties, game day, or brunch.
🧡 Customizable Heat LevelTherefore, you can make it mild, medium, or hot—just how you like

🔪 How to Make Buffalo Cauliflower Wings

Step 1: Prep the Cauliflower
Cut a medium head of cauliflower into bite-sized florets. Rinse and pat them dry for maximum crispiness.

Step 2: Make the Batter
In a bowl, whisk together flour, plant-based milk (or regular milk), garlic powder, onion powder, salt, and pepper until smooth. The batter should be thick enough to coat the cauliflower.

Step 3: Coat the Cauliflower
Dip each floret into the batter, letting the excess drip off. Place them on a lined baking sheet or into your air fryer basket in a single layer.

Step 4: Bake or Air Fry
Bake at 425°F for 20–25 minutes (flip halfway), or air fry at 400°F for about 15 minutes until golden and crispy.

Step 5: Toss in Buffalo Sauce
Remove from oven and gently toss the crispy cauliflower in your favorite Buffalo sauce. Want it extra spicy? Add a pinch of cayenne or hot sauce.

Step 6: Return to Crisp Up
Place the coated cauliflower back in the oven or air fryer for another 10 minutes to let the sauce bake in and edges crisp up.

Step 7: Serve & Enjoy
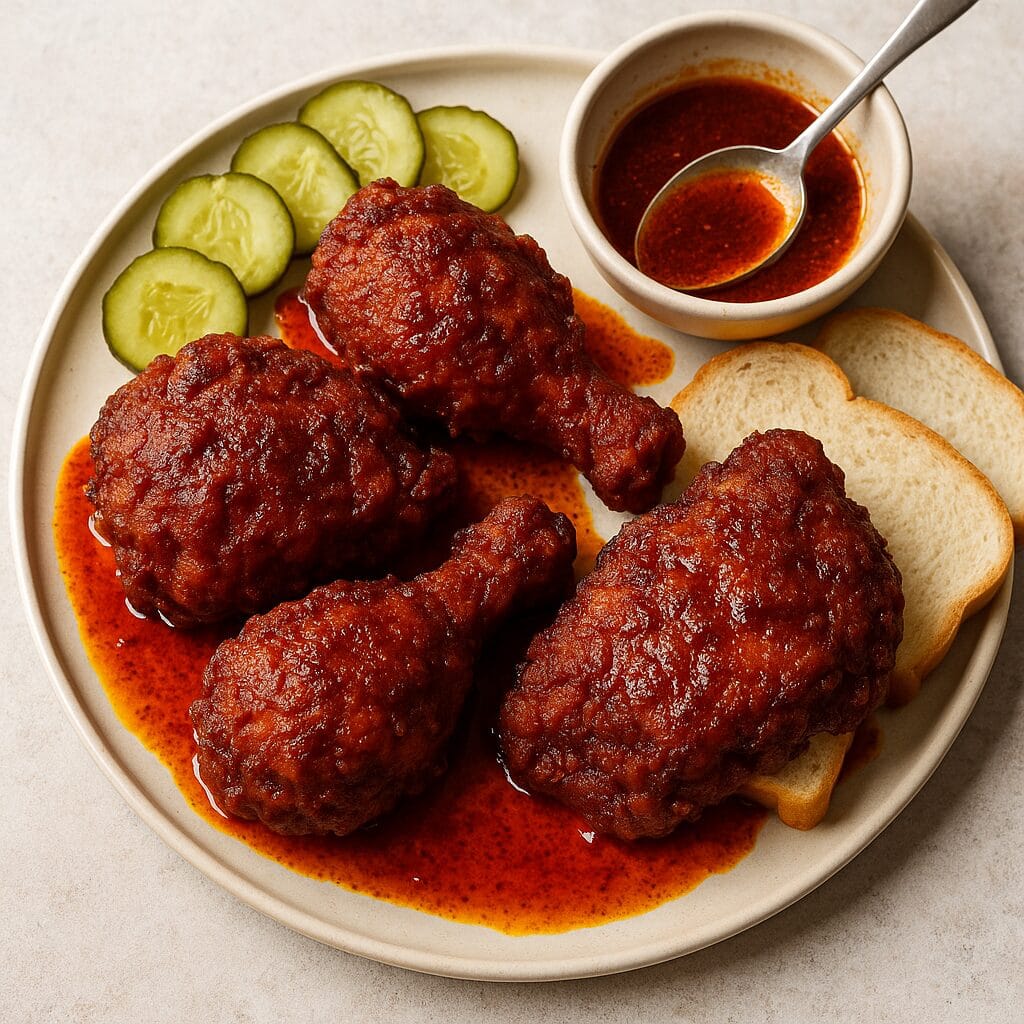
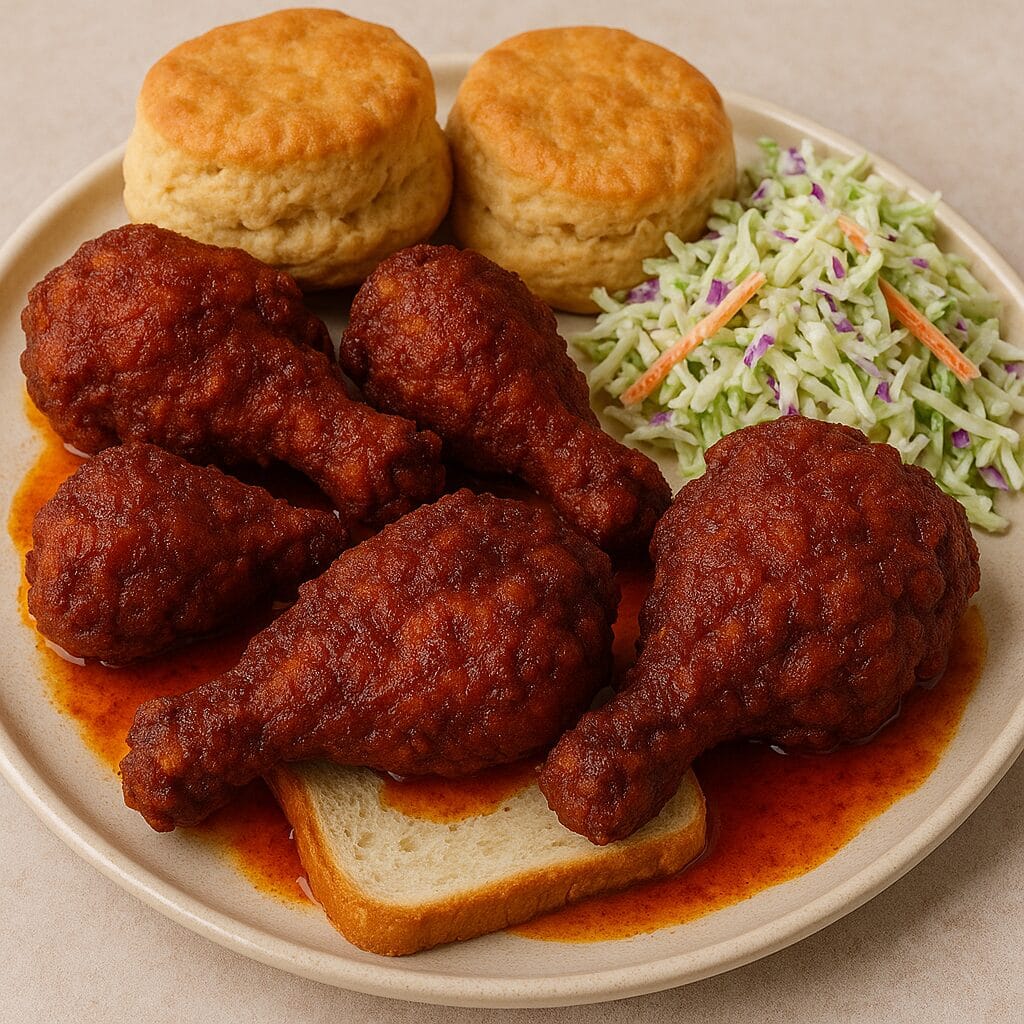
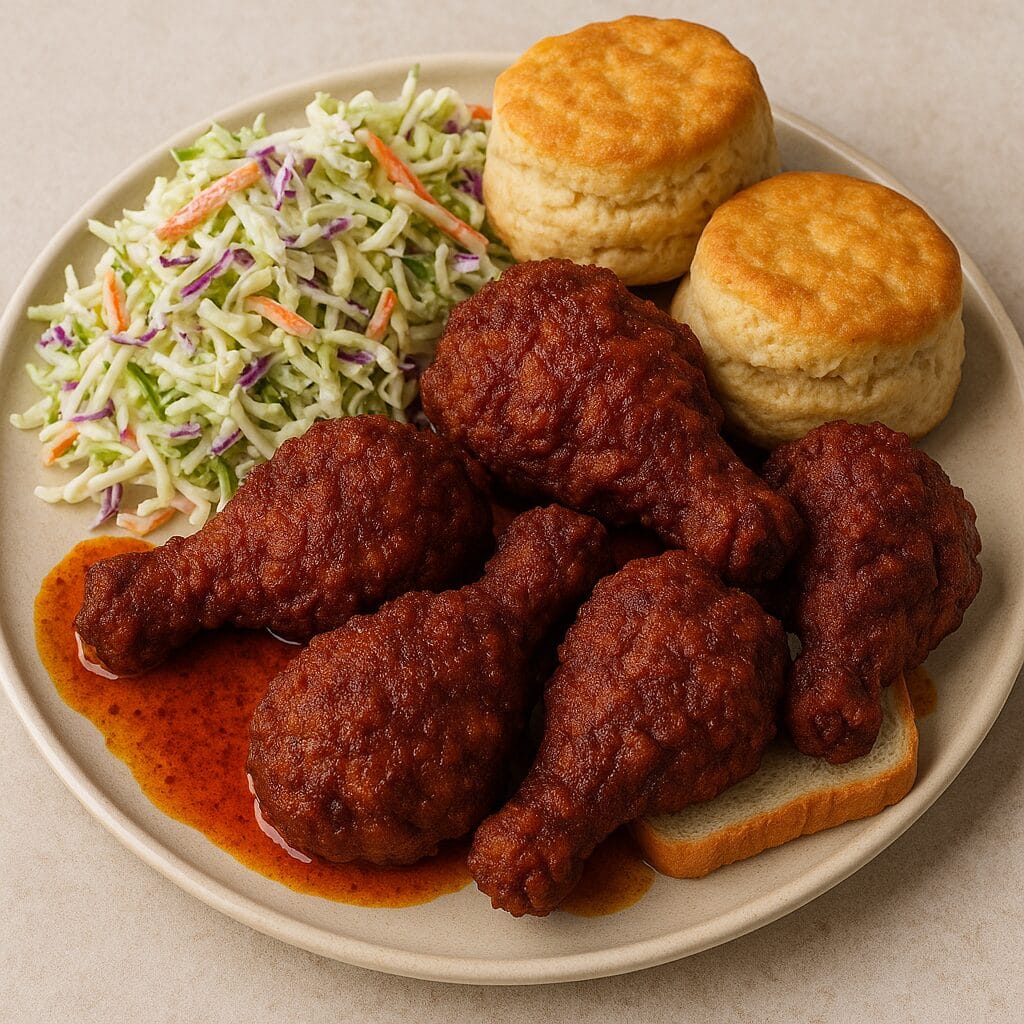
Serve hot with ranch or blue cheese dip, celery sticks, and maybe a sprinkle of fresh parsley or green onions. Dig in while they’re warm and crispy!

Jump to Section

📱 Follow Us 

📬 Subscribe for Updates

* indicates required

Intuit Mailchimp

Buffalo Cauliflower Wings

No ratings yet
These Buffalo Cauliflower Wings are crispy, spicy, and totally addictive! 🥦🔥 In addition, they’re baked or air-fried to golden perfection, then tossed in bold Buffalo sauce and served with creamy ranch or blue cheese dip. As a result, they make the perfect crowd-pleasing snack. Whether you're hosting game day or craving plant-based heat, this recipe delivers bold flavor without the meat. Therefore, it’s always a hit! 🌶️💥
Prep Time 10 minutes
Cook Time 35 minutes
Servings: 4 people
Course: Appetizer, Snacks
Cuisine: American, American Fusion
Calories: 170

Ingredients
  

  • Cup All-Purpose Flour Leveled
  • ¼ Cup Cornstarch
  • 1 tsp Garlic Powder
  • 1 tsp Onion Powder
  • 1 tsp Paprika
  • ½ tsp Sea Salt
  • ¾ Cup water
  • 2 Lbs Cauliflower Head

Equipment

1 Large mixing bowl (for coating the cauliflower in batter and tossing with sauce.)
1 Small bowl (for preparing the batter or buffalo sauce separately.)
1 Whisk or fork (to mix batter ingredients until smooth.)
1 Measuring cups & spoons ( for accuracy in flour, spices, and liquids.)
1 Cutting board (for chopping cauliflower into florets.)
1 Sharp chef’s knife (to cut through the cauliflower cleanly and safely)
1 Tongs ( for flipping the wings or tossing them in sauce without breaking them.)

Method
 

  1. Start by preheating your oven to 450 degrees Fahrenheit. While the oven is heating up, prepare two large baking sheets by lining them with parchment paper. This will help prevent the cauliflower from sticking to the baking sheets and make cleanup easier.
  2. In a large bowl, combine the flour, cornstarch, garlic powder, onion powder, paprika, and salt. Whisk the dry ingredients together until they are well combined. Gradually add the water to the bowl, whisking constantly, until a smooth batter forms. Make sure there are no lumps in the batter. Add the cauliflower florets to the bowl and use your hands or a spoon to gently stir until all the florets are evenly coated in the batter.
    ⅔ Cup All-Purpose Flour, ¼ Cup Cornstarch, 1 tsp Garlic Powder, 1 tsp Onion Powder, 1 tsp Paprika, ½ tsp Sea Salt, ¾ Cup water
  3. Using tongs or a fork, carefully lift the cauliflower florets out of the batter, allowing any excess batter to drip back into the bowl. Arrange the florets in a single layer on the prepared baking sheets, making sure they are not touching each other. Bake the cauliflower for 10 minutes, then remove the baking sheets from the oven. Use a spatula to carefully flip the florets. Return the baking sheets to the oven, swapping their positions on the oven racks. This will help ensure even cooking. Bake for another 10 minutes, or until the cauliflower is golden brown and crispy.
    2 Lbs Cauliflower Head
  4. Remove the baking sheets from the oven. Using a pastry brush or a spoon, brush the cauliflower florets with some of the buffalo wing sauce, making sure to coat them evenly. Return the baking sheets to the oven and bake for another 12 to 15 minutes, or until the cauliflower is dark golden brown and crisp around the edges. The exact cooking time will depend on your oven and the size of the cauliflower florets.
  5. Remove the baking sheets from the oven and let the cauliflower cool slightly. Brush the cauliflower florets with additional buffalo wing sauce, making sure to coat them evenly. This will add extra flavor and spice. Transfer the cauliflower wings to a serving platter or individual plates. Serve immediately while they are still hot and crispy. For dipping, ranch dressing is a classic pairing that helps to cool the heat of the buffalo sauce.

Nutrition

Serving: 12ozCalories: 170kcalCarbohydrates: 36gProtein: 7gFat: 1gSaturated Fat: 0.3gPolyunsaturated Fat: 0.2gMonounsaturated Fat: 0.1gSodium: 363mgPotassium: 726mgFiber: 5gSugar: 4gVitamin A: 247IUVitamin C: 109mgCalcium: 58mgIron: 2mg

Notes

📝 Recipe Notes – Buffalo Cauliflower Wings

  • Flour Options: You can use all-purpose flour, chickpea flour, or a gluten-free blend. Each offers a slightly different texture, so pick your favorite based on dietary needs.
  • Make It Extra Crispy: For extra crunch, add a tablespoon of cornstarch to the batter and bake on a wire rack instead of directly on parchment paper.
  • Buffalo Sauce Tip: Want more heat? Add cayenne or a splash of hot sauce. Prefer mild? Mix the Buffalo sauce with melted butter or Greek yogurt to tone it down.
  • Air Fryer Instructions: Cook at 400°F for 15–18 minutes, shaking the basket halfway through. They’ll come out extra crispy with minimal oil!
  • Vegan-Friendly: Use plant-based milk and vegan Buffalo sauce (most are!). Pair with dairy-free ranch or blue cheese for a fully vegan snack.
  • Reheating: Re-crisp leftovers in the oven or air fryer at 375°F for 5–8 minutes. Microwaving will soften the coating.
  • Serving Tip: These wings are best served immediately with cold celery sticks, carrot slices, and your favorite dip. Great as an appetizer, snack, or even a light main dish!

Tried this recipe?

Let us know how it was!

🧂 What to Serve with Buffalo Cauliflower Wings

These spicy, saucy bites are a total flavor bomb — but they’re even better when paired with the perfect sides and sips. Whether you’re planning a game day spread, party platter, or just spicing up your snack routine, here are some delicious ideas to serve alongside your Buffalo Cauliflower Wings:

🥕 Cool & Crunchy

Celery & Carrot Sticks: The classic combo — crisp, refreshing, and the perfect cooling contrast to all that heat.
Cucumber Ranch Salad: Sliced cucumbers, red onion, and dill tossed in creamy ranch dressing. Light, cooling, and super easy.
Apple Slaw: A sweet and tangy slaw made with cabbage, apples, and a light vinaigrette for a little crunch and contrast.

🍚 Hearty & Comforting

Mac & Cheese: Creamy, cheesy, and oh-so-satisfying — the ultimate comfort food to balance the spice.
Loaded Potato Wedges: Crispy wedges topped with cheese, scallions, and a drizzle of ranch or hot sauce.
Cauliflower Fried Rice: Keep the cauliflower theme going with a lighter twist that still satisfies.

🥑 Dips & Extras

Ranch or Blue Cheese Dip: A must-have for dunking — cool, creamy, and made to pair with Buffalo heat.
Avocado Crema: Smooth, tangy, and a little unexpected — like guac, but silkier.
Garlic Hummus: A savory side that tones down the spice and boosts the flavor variety.

🍹 Drinks to Cool the Heat

Iced Lemonade or Limeade: Sweet, citrusy, and perfectly refreshing.
Cucumber Mint Sparkler: Fizzy, crisp, and cooling — ideal for those fiery bites.
Non-Alcoholic Beer or a Cold Lager: Classic pairings for wings that just work.

❓ FAQ – Buffalo Cauliflower Wings


Can I make Buffalo Cauliflower Wings in an air fryer?

Yes! The air fryer is a great option for extra crispiness. Cook at 400°F for 15–18 minutes, flipping halfway. They’ll turn out perfectly golden and crunchy with less oil.


Are Buffalo Cauliflower Wings vegan?

They can be! Just use plant-based milk for the batter and a vegan Buffalo sauce (many are naturally vegan). Serve with dairy-free ranch or blue cheese dip to keep it fully plant-based. 🌱


Can I make them gluten-free?

Absolutely. Swap the all-purpose flour with a gluten-free flour blend or chickpea flour for a delicious GF version. Just make sure your hot sauce is also gluten-free.


How spicy are these wings?

They’re moderately spicy, depending on the Buffalo sauce you use. You can reduce the heat by using a mild sauce or mixing it with a bit of melted butter or Greek yogurt to mellow it out.


How do I keep them crispy after tossing in sauce?

For the best texture, return them to the oven or air fryer for 5–10 minutes after tossing in sauce. This helps the coating re-crisp and bakes in the flavor.


What should I serve with Buffalo Cauliflower Wings?

Classic sides include celery sticks, carrots, and ranch or blue cheese dip. You can also pair them with mac and cheese, slaw, or seasoned fries. Check out our full “What to Serve” section for tasty ideas!


Can I prep these ahead of time?

You can prep the batter and cut the cauliflower in advance, but for the best texture, bake or air-fry them right before serving. Reheating can work, but they’re crispiest when fresh.

Please follow and like us:
onpost_follow
fb-share-icon197
Tweet120
Pinterest20
Share 20
submit to reddit

Nashville Hot Chicken

Nashville Hot Chicken

Bring the heat with this fiery Southern classic! Our Nashville Hot Chicken features ultra-crispy, golden-fried chicken drenched in a signature spicy oil blend made with cayenne, paprika, and a hint of brown sugar for a touch of sweet heat. Served atop soft white bread, with tangy pickles, creamy coleslaw, and buttery biscuits on the side, this dish delivers a bold crunch, a smoky burn, and soul-satisfying Southern comfort in every bite. Perfect for spice lovers and comfort food fans alike!

Nashville Hot Chicken

No ratings yet
Get ready for a flavor explosion with Nashville Hot Chicken! This iconic dish is not for the faint of heart, but if you crave bold, spicy flavors, you're in for a treat.
Imagine crispy, juicy fried chicken coated in a fiery red oil that will set your taste buds ablaze. The heat is balanced by a touch of sweetness and a hint of smokiness, creating a complex and addictive flavor profile. Served on a bed of white bread with pickles to cool the burn, Nashville Hot Chicken is a culinary adventure that will leave you wanting more.
Are you brave enough to take on the heat? 🔥🐔
Prep Time 20 minutes
Cook Time 16 minutes
Additional Time 2 hours 25 minutes
Servings: 6 people
Course: Lunch, Main Course
Cuisine: American, Southern
Calories: 903

Ingredients
  

Ingredients
  •  
    1 Whole Chicken Cut into 8 pieces
Marinade
  •  
    1 Cup Buttermilk
  •  
    ¼ Cup Pickle Brine
  • 2 Tbsp. Hot Sauce Louisiana style of course
  • 1 Large Egg
Flour
  • 2 Cups All-Purpose Flour
  • 2 Tsp. Salt
Sauce
  • ¼ Cup Unsalted Butter
  •  
    ¼ Cup Lard
  • 2 Tbsp. Cayenne Pepper
  •  
    1 Tbsp. Light Brown Sugar packed
  •  
    1 Tsp. Smoked Paprika
  • ½ Tsp Garlic Powder
  • ½ Tsp. Kosher Salt
  • ½ Tsp. Ground Black Pepper
  • 1 Cup Vegetable Oil for frying

Method
 

  1. To marinate the chicken, place the pieces in a large bowl. Whisk together the buttermilk, pickle brine, hot sauce, and egg in a separate bowl. Pour the marinade over the chicken, making sure each piece is fully coated. Cover and refrigerate for at least 2 hours, and up to 4 hours.
    1 Whole Chicken, 1 Cup Buttermilk, ¼ Cup Pickle Brine, 2 Tbsp. Hot Sauce, 1 Large Egg
  2. In a shallow dish, combine the flour and salt. Remove the chicken from the marinade and use paper towels to gently pat off any excess marinade. This will help the flour adhere better. Toss the chicken in the flour mixture until each piece is thoroughly coated. Next, return the chicken to the marinade, turning to coat all sides. Remove the chicken from the marinade, allowing any excess to drip back into the bowl. Finally, coat the chicken once again in the flour mixture. Place the breaded chicken on a wire rack and let it sit at room temperature for about 15 minutes. This will allow the coating to dry out slightly, which will help it become extra crispy when fried.
    2 Cups All-Purpose Flour, 2 Tsp. Salt
  3. In a large pot or Dutch oven, combine the butter, lard, cayenne pepper, brown sugar, paprika, garlic powder, kosher salt, and black pepper. Place the pot over medium-high heat. Cook the mixture, stirring constantly, until the butter and lard are completely melted and the spices are fragrant. This will help to bloom the spices and create a more flavorful sauce. Remove the pot from the heat and set it aside. Keep the sauce warm while you prepare the chicken. You can do this by placing the pot in a warm oven or over a very low heat setting on the stovetop.
    ¼ Cup Unsalted Butter, ¼ Cup Lard, 2 Tbsp. Cayenne Pepper, 1 Tbsp. Light Brown Sugar, 1 Tsp. Smoked Paprika, ½ Tsp Garlic Powder, ½ Tsp. Kosher Salt, ½ Tsp. Ground Black Pepper
  4. Pour enough vegetable oil into a large cast iron skillet to fill it about 1/3 of the way. Heat the oil to 350 degrees Fahrenheit over medium-high heat. It's important to use a thermometer to monitor the oil temperature, as it can fluctuate during cooking. Carefully place the chicken pieces in the hot oil, skin-side down. Maintain an oil temperature of 325 degrees Fahrenheit, adjusting the heat as needed to keep it within that range. Fry the chicken until an instant-read thermometer inserted into the thickest part registers 160 degrees Fahrenheit, which should take about 8 to 10 minutes per side.
    1 Cup Vegetable Oil
  5. When the chicken has reached an internal temperature of 160 degrees Fahrenheit, carefully remove the pieces from the hot oil using tongs or a slotted spoon. Transfer the chicken to a wire rack set over a baking sheet. This will allow any excess oil to drain off and keep the chicken crispy. Brush the chicken generously with the hot sauce, making sure to coat both sides evenly. The chicken will continue to cook slightly as it rests. Serve the Nashville Hot Chicken immediately while it's hot and crispy.

Nutrition

Serving: 13ozCalories: 903kcalCarbohydrates: 57gProtein: 11gFat: 71gSaturated Fat: 18gPolyunsaturated Fat: 33gMonounsaturated Fat: 17gTrans Fat: 1gCholesterol: 84mgSodium: 1846mgPotassium: 260mgFiber: 3gSugar: 7gVitamin A: 1948IUVitamin C: 3mgCalcium: 110mgIron: 4mg

Notes

Ingredients:
  • Chicken: Bone-in, skin-on chicken pieces are traditional. You can use a whole chicken cut into pieces, or individual pieces like thighs, drumsticks, and breasts.
  • Marinade: Buttermilk, pickle brine, hot sauce, and egg create a flavorful marinade that tenderizes the chicken.
  • Coating: A double coating of seasoned flour helps create an extra crispy crust.
  • Frying Oil: Use an oil with a high smoke point, such as vegetable oil or peanut oil.
  • Hot Sauce: This is where the magic happens! The sauce is typically made with butter, lard, cayenne pepper, brown sugar, paprika, garlic powder, and other spices.
  • Sides: Classic accompaniments include white bread and dill pickle chips.
Cooking the Chicken:
  • Marinate: Marinate the chicken for at least 2 hours to allow the flavors to penetrate and the chicken to tenderize.
  • Double Dredge: The double coating of flour helps create an extra crispy crust.
  • Fry Carefully: Fry the chicken in batches to avoid overcrowding the pan and ensure even cooking. Maintain a consistent oil temperature for optimal results.
  • Check for Doneness: Use a meat thermometer to ensure the chicken is cooked through. The safe internal temperature for cooked chicken is 165 degrees Fahrenheit (74 degrees Celsius).
  • Drain and Sauce: Drain the fried chicken on a wire rack to remove excess oil. Brush generously with the hot sauce while still hot.
Serving:
  • Serve Immediately: Nashville Hot Chicken is best served immediately while it's hot and crispy.
  • Traditional Sides: Serve with white bread slices and dill pickle chips to help balance the heat.
  • Additional Sides: Consider adding other Southern sides like coleslaw, baked beans, or mac and cheese.
  • Heat Levels: Nashville Hot Chicken is traditionally served in varying levels of heat, from mild to "burn-your-mouth" hot. Adjust the amount of cayenne pepper in the sauce to control the heat level.
Important Notes:
  • Safety: Be cautious when working with hot oil. Use a deep-fry thermometer to monitor the temperature and avoid splattering.
  • Spice Level: Adjust the amount of cayenne pepper in the sauce to your preferred heat level. Start with less and add more gradually to taste.
  • Freshness: Use fresh, high-quality ingredients for the best flavor.
With these tips, you'll be able to create a delicious and authentic Nashville Hot Chicken experience at home!

Tried this recipe?

Let us know how it was!

Related Recipes

Ingredients

Ingredients:

  • For the Chicken:
    • 1 whole chicken, cut into 8 pieces
  • For the Marinade:
    • 1 cup buttermilk
    • ¼ cup pickle brine
    • 2 tablespoons Louisiana-style hot sauce
    • 1 large egg
  • For the Flour Coating:
    • 2 cups all-purpose flour
    • 2 teaspoons fine table salt
  • For the Hot Sauce:
    • ¼ cup butter
    • ¼ cup lard
    • 2 tablespoons cayenne pepper
    • 1 tablespoon packed light brown sugar
    • 1 teaspoon paprika
    • ½ teaspoon garlic powder
    • ½ teaspoon kosher salt
    • ½ teaspoon freshly ground black pepper
  • For Frying:
    • 1 cup vegetable oil, or as needed

Image Gallery Nashville Hot Chicken

Storage & Leftovers

Storage:

  • Refrigerator: Let the chicken cool completely, then store in an airtight container. Keeps well for up to 3–4 days.

  • Separate Sides: Store coleslaw separately in its own sealed container (up to 3 days), and keep biscuits in a zip-top bag or airtight container at room temp for 1–2 days, or refrigerate up to 5 days.

Reheating:

  • Oven (Best method): Preheat to 375°F. Place chicken on a wire rack over a baking sheet and bake for 10–15 minutes, or until heated through and crispy.

  • Air Fryer: Reheat at 350°F for about 5–7 minutes for a quick crisp.

  • Microwave: Not recommended if you want to preserve the crunch, but usable in a pinch—reheat in 30-second bursts until hot.

Pro Tips:

  • Reheat biscuits wrapped in foil in the oven for 5 minutes.

  • Stir coleslaw before serving again; add a splash of vinegar or mayo if needed.

  • For next-day magic: use leftovers to make spicy chicken sandwiches or toss chopped hot chicken into a wrap or salad!

Please follow and like us:
onpost_follow
fb-share-icon197
Tweet120
Pinterest20
Share 20
submit to reddit

Subscribe for New Recipes

* indicates required

Intuit Mailchimp